Easy Roasted Garlic and Rosemary Sourdough Bread Recipe
This post may contain affiliate links. Please read our disclosure policy.
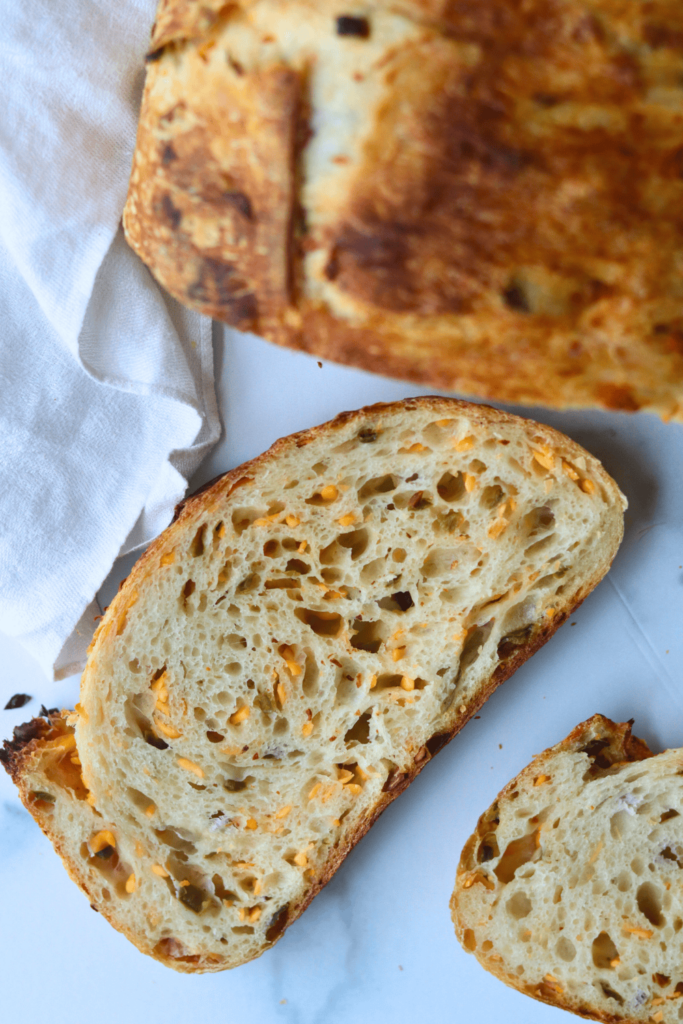
My easy sourdough bread recipe just got a savory upgrade. With roasted garlic, fresh rosemary, and cubes of Asiago cheese, this loaf fills your kitchen with an irresistible aroma and brings bold, herb-and-cheese flavor to your sourdough. It’s perfect toasted alongside soups and stews, sliced thick for grilled cheese, or even enjoyed on its own. Leftovers stay fresh for a few days at room temperature, or you can freeze slices and toast them anytime for a quick, flavorful bite without starting a whole loaf from scratch.

MY LATEST VIDEO
Why You’ll Love This Recipe
- Roasted Garlic Adds Deep, Sweet Flavor–The garlic is roasted until soft and golden, transforming its sharp bite into a mellow, rich flavor that infuses the homemade loaf. Each slice carries that fragrant, slightly sweet garlic aroma that fills your kitchen and makes your sandwiches, soups, or grilled cheese feel even more flavorful. This method of incorporating bold, flavorful mix-ins is similar to how my Jalapeño Cheddar Sourdough Bread packs punch with diced jalapeños and cubes of cheddar folded throughout the dough.
- Flavor Boost from Fresh Rosemary and Cubed Cheese–Fresh rosemary adds a bright, fragrant aroma that goes perfectly with cubes of Asiago or Gruyere. As the cheese melts into the dough, it forms little pockets of creamy, savory flavor while the crust stays nice and crunchy. If you like that mix of sweet, savory, and aromatic flavors, the Cinnamon Raisin Sourdough Bread offers a sweet and spiced contrast you’ll want to try next.
- Overnight Fermentation – The dough ferments overnight, giving the sourdough starter plenty of time to develop a tender, airy crumb. That same long fermentation is what makes the Honey Oat Sourdough Bread so soft and flavorful, adding depth to your loaf without any extra effort.
Ingredients & Substitution
* To find precise measurements, scroll to the bottom of this post to find the recipe card*
- Active, bubbly starter: Before baking this cheesy rosemary garlic sourdough bread, you need to feed your own sourdough starter with equal parts water and flour. When your starter has doubled in size and has bubbles on top and throughout (usually 4-12 hours after a feeding), it’s ready to bake. If you’re still unsure, use the float test. Take a spoonful of your starter and a glass of water. Drop the starter in the water. If it floats, it’s ready. If it sinks, it needs some extra time to ferment.
- Room temperature water-Filtered or tap water works fine, just make sure it’s not cold so it doesn’t slow down the starter
- Bread Flour: My favorite brand is King Arthur Bread Flour. I use bread flour for its higher protein content.
- Salt: Any salt will work for this sourdough loaf, but I like Redmond’s Unrefined Fine Sea Salt for the extra minerals it offers.
- Fresh garlic – Roasted garlic gives this sourdough bread a mellow, rich flavor without overpowering the loaf. Roasting fresh garlic will give you the best flavor. If you’re in a pinch, you can swap 1 Tablespoon of garlic powder as a replacement.
- Fresh Rosemary: Fresh rosemary – Pick leaves off the stem and chop finely. To prep fresh rosemary, hold the top of the stem with one hand and drag your fingers down the stem to remove the leaves. Then chop them finely with a sharp knife. If fresh rosemary isn’t available, 1 Tablespoon of dried rosemary works as a substitute. You can also experiment with other fresh herbs and see how you like them.
- Cheese: Cubed for pockets of creamy, melty flavor throughout the bread. It’s not absolutely necessary to add cheese to this garlic sourdough bread recipe, but come on, you know you want to. I cut into cubes so the cheese distributes evenly and melts in pockets throughout the bread. These mild cheeses complement the garlic and rosemary, and cubed pieces spread more evenly than shredded.
- Extra virgin olive oil: Used for roasting the garlic.
How to Make Roasted Garlic and Rosemary Sourdough Bread:
Roast Garlic in the Oven
- Preheat the oven to 400°F.
- Peel off the papery layer of the garlic head while keeping the cloves intact.
- Cut a piece of aluminum foil big enough to wrap around the garlic.
- Chop off about 1/4 inch from the top of the garlic head.
- Place the garlic in the center of the foil and pour extra virgin olive oil on top, about 1 Tablespoon. Cover the garlic with the foil and place it in the preheated oven.
- Roast for 30–40 minutes, or until the garlic is golden brown and fragrant.
- Remove from the oven and let it cool for 5–10 minutes before adding to the bread dough.
Make the Dough

- In a large mixing bowl, add 50g of active, bubbly sourdough starter and 350g of room-temperature, filtered water. Mix with a dough whisk or your hand until it looks like a milky liquid.

- Add 500g of bread flour and 11g of salt. Mix until all the flour is incorporated. The dough will look shaggy, not like a uniform dough ball. Cover the bowl with a damp tea towel (or a reusable shower cap) and let the dough rest for at least 30 minutes before moving on.
Stretch and Folds
- With slightly wet fingers, scrape the dough away from the bowl. Grab a section of the dough, stretch it above the bowl, and fold it over on top.
- Rotate the bowl a quarter turn clockwise and repeat. Continue until you’ve gone all the way around. The dough will start to look smoother.
- Cover the dough and let it rest for another 30 minutes.
Mix-Ins
- Before the second round of stretch and folds, gather 1 Tablespoon of finely chopped rosemary, 1 head of roasted garlic, and 1 cup of cubed cheese.

- Sprinkle 1/3 of each mix-in on top of the dough. Do a stretch and fold. Repeat with another 1/3, then the last 1/3. Some cubes may break through the dough – that’s fine. They’ll continue mixing in during the next rounds. Cover and rest for 30 minutes.

- Repeat the stretch and fold three more times (for a total of five rounds), waiting at least 30 minutes between each. Cover the dough with a damp tea towel or shower cap after each round.

Bulk Fermentation
- After all 5 rounds of stretch and folds, cover the dough with a damp towel or shower cap and leave it on your countertop to rise overnight 10–12 hours.
- During this first rise, the sourdough starter ferments the flour, creating air pockets for that desirable crumb.
Shape
- The next day, the dough should have doubled in size and not look dense.
- With slightly wet fingers, gently release the dough from the sides of the bowl. Be careful not to pop the bubbles.
- Tilt the bowl and let gravity move the dough onto your work surface.

- Stretch the dough into a thin rectangle.

- Fold the top 1/3 toward the center, then fold the bottom 1/3 toward the center as well (a tri-fold).

- From the right side, roll the dough to the left to create a ball.

- Let it rest 5–10 minutes with the seam side down.
- While the dough rests, prepare your proofing basket (banneton or small bowl lined with a tea towel). Dust the banneton with flour so the dough doesn’t stick. You can use rice flour or a mix of rice and all-purpose flour/bread flour.]
- After resting, gently cup your hands around the dough ball. Turn it clockwise about a quarter turn, softly pull the dough toward you, and repeat until it forms a tighter, round shape. Carefully place the dough smooth-side down into the floured proofing basket. Cover with a damp tea towel or shower cap.
- Place the proofing basket in the fridge. Let the dough rise for at least 1 hour, ideally 8–12 hours. Don’t wait too long! Over-proofed dough won’t rise in the oven, but you can bake it as focaccia to salvage it.
Score
- After 8–12 hours, remove the dough from the fridge.
- Cut a piece of parchment paper big enough to hold the dough. Flip the banneton upside down over the parchment so the dough lands smooth-side up.
- Score a crescent moon or any design you like.
- Grab the corners of the parchment paper and place the dough in your Dutch oven.
Bake
- With the lid on, place your cold Dutch oven on a baking sheet (prevents the bottom from burning). Slide the tray and Dutch oven into the cold oven and preheat to 450°F. Bake for 55 minutes (this includes the preheat time).
- Remove the lid and bake 5 more minutes, or until golden brown.
- Immediately remove the Dutch oven and lift the bread using the parchment corners. Place it on a cooling rack.

Cool and Serve
- Let the bread cool for 1 hour before cutting. Listen to your loaf “sing” as it cools.
- After an hour, slice and slather on butter and enjoy. Serve thick slices of roasted garlic and rosemary sourdough with a big slab of butter. For extra garlic punch, make some garlic or garlic herb butter, garlic breath isn’t real, right? This bread turns into a killer grilled cheese, especially with melty cheese and a bowl of basil tomato soup. Have leftover slices? I turn mine into breadcrumbs, and the garlic and rosemary make them amazing in my mother-in-law’s meatballs.
McKenna’s Helpful Tips
- Don’t skip roasting the garlic – Roasting garlic transforms its sharp bite into soft, sweet, rich flavor that infuses every slice. Even if you’re short on time, a tablespoon of garlic powder works in a pinch, but the roasted version is worth it.
- Prep your rosemary right – Strip the leaves from the stem by holding the top and dragging your fingers down. Chop the leaves finely. Fresh rosemary adds a bright, fragrant note that pairs perfectly with the cheese and garlic. If fresh isn’t available, a tablespoon of dried rosemary is a good backup.
- Cube the cheese – Cubed cheese melts into little pockets, spreading flavor evenly through the dough. Mild cheeses like Asiago or Gruyere work best with garlic and rosemary. Cubes are easier to handle than shredded.
- Give your dough time to rest – Let it rest between stretch-and-fold sessions and after shaping. This relaxes the dough, makes it easier to work with, and helps it rise evenly for a light, airy crumb that holds all those garlic, rosemary, and cheese pockets.
- Flour the proofing basket – Dust your banneton or lined bowl with flour so the dough doesn’t stick. You can use rice flour or a mix of rice and all-purpose/bread flour.
How to Store
Garlic sourdough bread will stay fresh for 2-3 days at room temperature. Cover it with a tea towel and leave it on the counter. You can also freeze it, either as a whole loaf or as slices. I like to freeze slices so I can toast just what I need instead of thawing a whole loaf. To freeze, put the loaf or slices in a plastic bag, adding small pieces of parchment between slices so they don’t stick, and remove all extra air.
Frozen sourdough will keep for up to 3 months. To thaw, heat a whole loaf in the oven at 325°F for 20-30 minutes until soft in the middle. For slices, microwave them for 15 seconds or pop them in the toaster.

FAQs
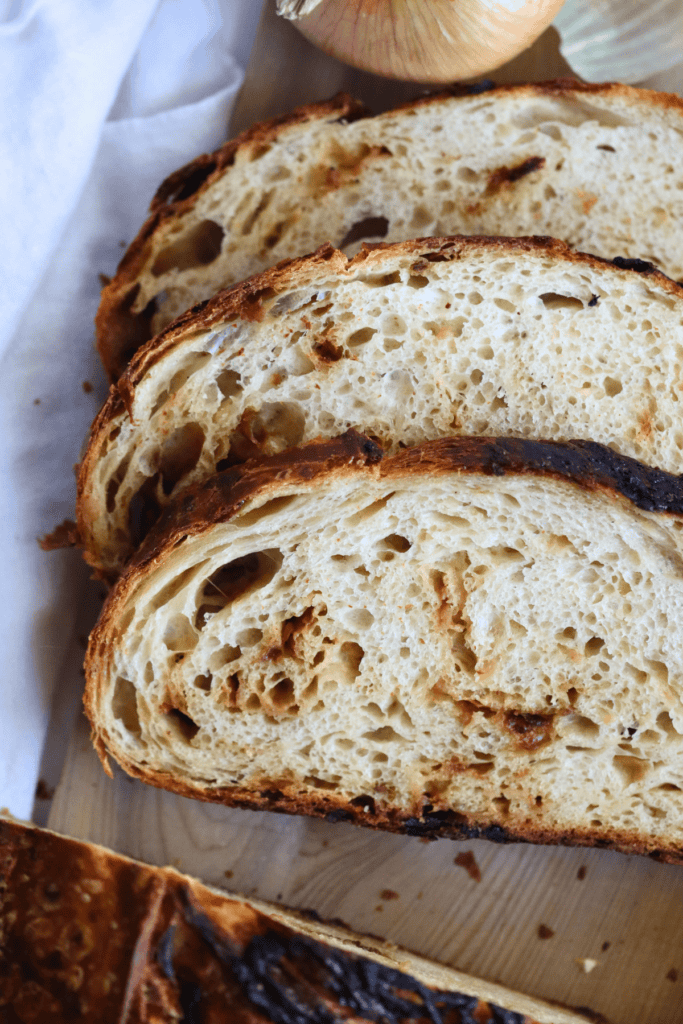
Yes! If you don’t have Asiago or Gruyere, try mild cheddar, Fontina, or Havarti. If you love adding cheese to sourdough, then you’d love my Caramelized Onion & Gruyere Sourdough Bread recipe!
You can use 1 tablespoon of dried rosemary instead. Other fresh herbs like thyme or oregano can be used, but rosemary is what gives this loaf its distinct flavor.
Roasting really brings out a mellow, sweet flavor, but if you’re short on time, 1 tablespoon of garlic powder will still give a garlicky taste.
Your starter should be active and bubbly, usually 4–12 hours after feeding. If unsure, do the float test: drop a spoonful in water. If it floats, it’s ready. And if it sinks? Give it a little more time.


Roasted Garlic and Rosemary Sourdough Bread Recipe
Enter your email below, and we’ll send it straight to your inbox! Plus, you’ll get my newest sourdough recipes and best tips every week!
Ingredients
- 50 grams active sourdough starter 2 Tablespoons
- 350 grams water, room temperature scant 1 1/2 cups
- 500 grams bread flour 3 1/2 cups + 1 Tablespoon
- 10 grams salt 1 1/2 teaspoons
- 1 head of garlic
- 14 grams olive oil 1 Tablespoon
- 3 grams fresh rosemary, chopped finely 1 Tablespoon
- 175 grams Asiago / Gruyere cheese, 1/4 inch cubes or shredded (optional) 1 1/4 cups
Instructions
How to Roast Garlic in the Oven:
- Preheat the oven to 400 degrees F.
- Peel off the papery layer of the garlic bulb while keeping the cloves intact. Cut a piece of aluminum foil big enough to wrap around the garlic. Chop off 1/4 of an inch of the top of the garlic bulb.1 head of garlic
- Place the garlic in the center of the foil and pour extra virgin olive oil on top. Cover the head of garlic with the foil and place it into the preheated oven.14 grams olive oil
- Roast for about 30-40 minutes or until the garlic is golden brown and fragrant.
- Remove from the oven and cool for 5 – 10 minutes before adding to the bread dough.
How to Prepare Fresh Rosemary:
- To use fresh rosemary, gently remove the leaves from the stem. Do so by holding the top with one hand and dragging the fingers of your other hand down the stem. Once removed, chop the rosemary leaves finely.3 grams fresh rosemary, chopped finely
Make the Dough :
- In a straight edge bowl, add the active sourdough starter and room temperature water. Mix with a Danish dough whisk or your hand until it looks like a milky liquid.I love using this straight edge bowl because it allows me to clearly see when the dough has risen to 75%.50 grams active sourdough starter, 350 grams water, room temperature
- To the wet ingredients, add the bread flour and salt. Be sure to mix until all of the flour is incorporated. The dough will look shaggy, not like a uniform dough ball.500 grams bread flour, 10 grams salt
- Cover the bowl with the plastic cover or plastic wrap and let the dough rest for at least 30 minutes before you move on to the next step.
Stretch and Folds:
- With slightly wet fingers, scrap the dough away from the bowl. Grab a section of the dough and stretch the bread dough above your bowl. Then fold over on top of the dough.
- Rotate your bowl clockwise a quarter of the way and repeat identical stretch and fold. Repeat the process until you come full circle. You will notice the dough will start to look much smoother than before.
- Cover the dough again and let rest for another 30 minutes.
Mix-Ins :
- Before starting your second round of stretch and folds, prepare the mix ins. Squeeze the head of roasted garlic to remove the bulbs from the papery layer.
- To the top of your dough, sprinkle 1/3 of each mix-in. Perform a stretch and fold. Then add another 1/3 of the mix-ins, do one more stretch and fold. Add the last 1/3 of the mix-ins and complete the rest of the stretch and folds. Cover and let rest for another 30 minutes.175 grams Asiago / Gruyere cheese, 1/4 inch cubes or shredded (optional)
- The cubes of cheese may break through the dough, totally fine. They will continue to be mixed in during your next rounds of stretch and folds.
- Repeat the identical stretch and fold two more times (for a total of 4 different rounds), waiting at least 30 minutes between each stretch and fold. Cover the dough after each stretch and fold.
- Once you have completed the final set of stretch and folds, cover the dough and let it rest for the remainder of the bulk fermentation at room temperature, about 9-11 more hours if the dough is kept at 68-70 degrees F.
Bulk Fermentation
- Now this is the most finicky part of sourdough. There isn’t a set time for your bulk ferment. It is greatly dependent on the temperature of your environment. The warmer it is, the faster your dough will ferment. The opposite is true for cooler temperatures.
- In an environment of 68-70 degrees F, doughs will typically bulk ferment for 9-11 hours more after the stretch and folds, but again, you will have to look for the signs that your dough is done fermenting, rather than the clock. Warmer temperatures will be faster, while cooler temperatures will be slower.
Here’s what to look for:
- The dough should have increased in size by at least 75% and be domed on top.The dough looks light, and jiggles when the bowl is shaken.The dough should easily pull away from the bowl.There should be visible bubbles in the dough and on top.The dough doesn’t tear when you do a windowpane test
Pre-Shape
- Once your dough has completed its bulk fermentation, continue on to the pre-shape.
- With slightly wet fingers, gently release the dough from the sides of the bowl. Be careful not to pop all of those lovely bubbles! Tilt the bowl and leave gravity to do the work to move the dough on the counter.
- Shape the dough by doing another round of stretch and folds until you have gone full circle.
- With a bench scraper or your hands, turn the dough upside down, so the seam is now on the counter. Cover the dough with the bowl and let it rest for 30 minutes.
Prep Banneton :
- While you are waiting for the dough to rest, prepare your proofing basket. This can either be a banneton or a small mixing bowl lined with a tea towel. The purpose of this proofing basket is to keep the tight shape that you will create, so make sure you are using a standard bowl that is small enough to help keep the shape.
Final Shaping :
- After 30 minutes of rest, flip the dough, with the seamed side up. Gently pull the bottom of the dough towards you, then fold it towards the center of the dough. Pull the right side of the dough out and fold towards the center. Repeat with the left side. Finally, stretch the top of the dough away from you and fold towards the center of the dough.
- For a boule shape, flip the dough over again, seam side down.Gently cup your hands around the dough ball. Turn the ball in a clockwise motion about a quarter turn and then softly pull the dough towards you. Do this repeatedly until you see the dough form a tighter and more round shape. Stop if the dough starts to tear.
- With a bench scraper or just your hands, carefully scoop up the dough and lay it upside down (seem side up) into your floured proofing basket and cover it with a plastic bag or a shower cap.
- For a batard shape, roll up the dough starting with the dough closest to you. Once rolled, pinch the seams of each end close, then gently place the rolled up dough into the prepared banneton (seam side up). Cover it with plastic bag or a shower cap.
Cold Proof :
- Place your proofing basket in the fridge to cold-proof for 8-72 hours.Cold fermenting the dough in the fridge slows down the fermentation process, which enhances the flavor of your loaf. It also gives you more flexibility when you bake your bread.But don’t wait too long! If left in the fridge for too long, your dough will over-ferment, causing the dough to not be able to rise while baking.
Score :
- Thirty minutes before baking, place the dough in the freezer. This helps with the scoring design.
- Cut a piece of parchment paper that is big enough for your dough to be surrounded on the bottom and its edges.
- Place parchment paper on your workspace and gently flip the banneton upside down over the parchment paper. Since you dusted the banneton, your dough should slowly release and fall onto the parchment paper, landing in the middle with the floured side facing up.
- With a lame/ razor blade or sharp knife, score a crescent moon shape or any other fancy design you might find on Pinterest that you are dying to try! Grab the corners of the parchment paper and place it into your Dutch oven.
Bake:
**This recipe can be baked in a HOT Dutch oven, if you prefer. See Notes below for step-by-step directions.
- With its lid on, place your COLD Dutch oven on a baking sheet – this helps prevent the bottom of your loaf from burning and getting too crispy. Slide the baking tray and Dutch oven into the COLD oven and preheat it to 450 degrees. Bake for 55 minutes. The baking time includes the preheat time.
- After 55 minutes, remove the lid and bake for an additional 5-10 minutes, or until golden brown or the internal temperature reaches 205-210 degrees F.
- Immediately remove the Dutch oven from your oven. Using the corners of the parchment paper, lift the sourdough bread and place it onto a cooling rack to cool.
- Allow your homemade bread to cool for one hour before cutting into it. (I know!! How can you possibly wait when it looks and smells so good?! But trust me, if you cut in too soon, your masterpiece will turn mushy and gummy.) In the meantime, listen to your loaf "sing" its little tune to you with every crinkle and crack.
- Once the hour is up, slice into your work of art and slather on some butter, and ENJOY!
Notes
Bake in Preheated Oven
- Preheat the Dutch oven in a 500 degree F oven for 30 minutes.
- Reduce the oven temperature to 450 degrees F. Carefully place the dough into the hot Dutch oven, then bake the loaf for 27 minutes covered.
- Continue to bake for an additional 10-15 minutes uncovered until golden brown or the internal temperature reaches 205-210 degrees F.
Recipe Tips
- Substitute 1 Tablespoon of garlic powder for 1 head of roasted garlic.
- Substitute 1 Tablespoon of dried rosemary for fresh.
- Garlic Sourdough Bread will stay fresh for 2-3 days. Cover with a tea towel and leave at room temperature.
- Freeze loaf or slices in a plastic bag for up to 3 months.

Hello love! Your recipe is amazing! I’m just waiting o see how it comes out as it’s my first time baking with sourdough!🤭 my question is when i mixed the starter with water then the four and salt, my dough isn’t, Shaggy its on the dry side like if it was an artisan bread and i did follow thru your recipe even using a scale🤓 to make sure the measurement’s were correct. for the flour you said 500g that should equal to 3cups 1/2. but thats not the calculation that i got😩 on my scale. instead it went over!😔help
Thank you so much! I hope you love the finished loaf! If you’re using a scale, I would trust the 500 g measurement over the cup measurement, as cup conversions can vary quite. Also, don’t worry if the dough seems a little dry right after mixing. Give it the full rest time before your first stretch and fold, and it should become much more hydrated and easier to work with. Happy baking!
Was wondering if I could make this recipe with all purpose flour instead of bread. If so would I have to make any additional adjustments in the recipe?
Hi! Yes, you can make it with all-purpose flour. Since all-purpose flour has a little less protein than bread flour, the dough may be slightly softer and the loaf may not have quite as much oven spring, but it will still be delicious. I would start by holding back about 10–15 g of the water and only add it if the dough feels dry, since different brands of all-purpose flour can absorb moisture differently. Happy baking!
OMG. Best inclusion ever!!! Instructions were super easy to follow and straight forward. Thank you for sharing this wonderful recipe.
I have to agree… roasted garlic might be one of the best sourdough inclusions ever! I’m thrilled you found the instructions easy to follow and that the loaf turned out so well for you. Thank you for taking the time to leave such a kind review!
This was delicious!!! I added asiago cheese and I will for sure be making this again
Yum!! Asiago cheese is an incredible addition to this loaf. I’m so glad you enjoyed it and that it’s earned a spot on your repeat list. Thank you so much for sharing!
Can this be baked in a loaf pan? If so, what if any changes should be made?
I personally haven’t tested this myself, but I don’t see why not! I would back with the two-loaf pan method. Bake covered for the first part, then remove the top loaf pan and finish baking the bread until it reaches an internal temp of 205 degrees F. If you give it a go, I would love to hear how it turns out!
This smells delicious, but after being on the fridge for 9 hours my dough hasn’t risen. It’s a freezing cold ball. I think maybe my fridge is too cold. Can I put in on my warmer to thaw out and hope it will rise?
A cold fridge can really slow things down! You can absolutely take it out and place it in a warmer spot to let it continue fermenting. Just give it some time to come back to life—you should start to see it relax, soften, and rise as it warms up. I hope it turns out beautifully!
Hi! Thank you for this recipe! I’m making it right now – after your cold proof in the fridge, you don’t let the loaf come back to room temp before baking? i only have a few hours to cold proof before dinner time so trying to adjust when to take it out of the fridge since I can’t get the full 8-12 hrs. Thanks for the advice!
Great question! You don’t need to bring the loaf fully back to room temperature before baking. You can bake it straight from the fridge, which actually helps with oven spring. Since you’re doing a shorter cold proof (a few hours instead of overnight), I’d just make sure the dough has had enough time to bulk ferment and looks slightly puffy before going into the fridge. Then bake it cold when you’re ready. You should still get a great result!
I made this for Easter and it was a huge hit, it’s the best loaf I have made so far, thank you for sharing!
Easter is the perfect time for that loaf, and I’m honored it was part of your table. Hearing that it’s the best loaf you’ve made so far is such an amazing compliment. I really appreciate you taking the time to share that!
When do you add the garlic and rosemary? During the stretch and folds?
Correct! During the 2nd set of stretch and folds.
Amazingly good! The softest sourdough bread I’ve made to date! And the flavors and SO perfect. Good to eat with butter, to dip in oil/vinegar or as sandwich bread! I prefer it without the cheese (surprisingly)
Thank you so much for the kind comment! Seriously, the smell alone is worth baking this bread. Thrilled to hear you are loving it.
Amazing recipe! I made this for my family and got great reviews!
Thank you so much! I am so glad your family loved it and that it received such great reviews. Thank you for taking the time to leave such a kind comment!
This was by far the most delicious bread I’ve made!! Thank you for such a detailed and fun recipe. I might be making it weekly now lol. Thanks again!
This makes me so happy to hear — thank you! Roasted garlic and rosemary is such a dreamy combo, and I love that you had fun making it too. Thanks so much for the sweet comment!
Hi, this bread smells amazing!!! I followed the directions but I know I wasn’t 100% exact on the timing of steps, this was my first attempt at sourdough, and it looks beautiful on top, but the bottom burned. I put it on a baking sheet with the cold DO on top of the sheet and into the 450° oven for 55 min lid on, 10 min with it off. I can’t figure out why the bottom burned.
Oh, I’m so sorry to hear that! Here are a few suggestions!
Use parchment paper or a silicone mat: This adds a slight buffer between the dough and the hot surface. You can also crumple up some foil and place the bread on top so the dough doesn’t directly touch the Dutch oven.
Lower the oven slightly: 425°F can sometimes give a gentler bake for bottom crusts.
Your timing was fine—the burn is just from the combination of metal + intense direct heat. Your loaf still sounds delicious!