Chai Sourdough Bread Recipe
Yield: 1 loaf
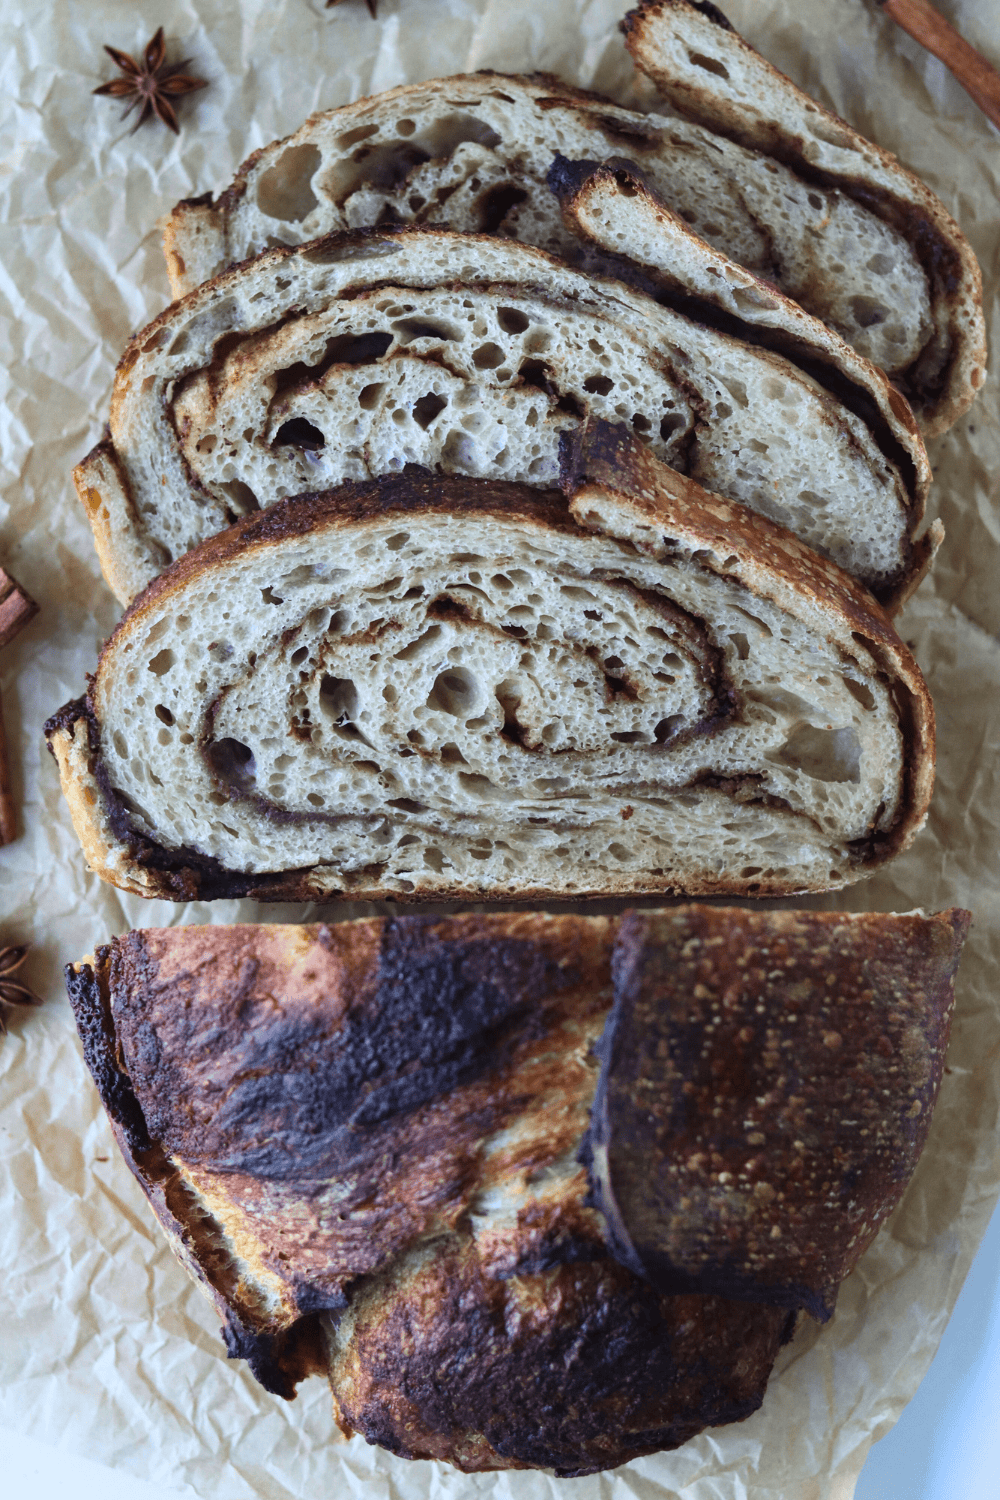
Sourdough Chai Bread combines warm spices and sweetness, creating a cozy fall treat that’s perfect for any chai lover!
Equipment
Ingredients
Chai Sourdough Bread
- 50 grams active sourdough starter heaping 1/4 cup
- 55 grams dark brown sugar 1/4 cup
- 350 grams water, room temperature 1 1/2 cups
- 500 grams bread flour 3 1/2 cups
- 9 grams salt 1 1/2 teaspoons
Chai Filling
- 57 grams unsalted butter 1/4 cup
- 55 grams dark brown sugar **see notes 1/4 cup
- 3 grams ground cinnamon 1 1/2 teaspoons
- 1 gram ground ginger 1/2 teaspoon
- .5 grams ground cardamon 1/4 teaspoon
- .5 grams ground nutmeg 1/8 teaspoon
- .5 grams ground cloves 1/8 teaspoon
- .5 grams ground allspice 1/8 teaspoon
- 5 grams all-purpose flour 1 1/2 teaspoons
Whipped Chai Butter
- 57 grams salted butter **see notes 1/4 cup
- 55 grams powdered sugar 1/4 cup
- 3 grams ground cinnamon 1 1/2 teaspoons
- 1 gram ground ginger 1/2 teaspoon
- .5 grams ground cardamon 1/4 teaspoon
- .5 grams ground nutmeg 1/8 teaspoon
- .5 grams ground cloves 1/8 teaspoon
- .5 grams ground allspice 1/8 teaspoon
Instructions
Feed your sourdough starter
- An active starter can take around 4–12 hours to peak, so adjust to what works best for your environment.
Make the Dough
- In a straight-edge bowl, add the active sourdough starter, dark brown sugar, and room-temperature filtered water. Mix with a Danish dough whisk or with your hand until it looks like tan-ish, milky liquid.I love using this straight-edge bowl because it allows to me clearly see when the dough is done rising.50 grams active sourdough starter, 350 grams water, room temperature , 55 grams dark brown sugar
- Then, add the bread flour and salt. Again, mix with a whisk or by hand. Be sure to mix until all of the flour is incorporated. The dough will look shaggy, not like a uniform dough ball.500 grams bread flour, 9 grams salt
- Cover and let the dough rest for at least a half hour before you move on to the next step.
Stretch and folds
- With a bowl scraper, scrape the dough away from the bowl. Now, with slightly wet hands, reach down to the bottom of the bowl, grab a section of the dough and stretch the bread dough above itself. Then fold it over on top of the dough.
- Rotate your bowl clockwise a quarter of the way and repeat identical stretch and fold. Repeat the process until you come full circle. You will notice the dough will start to look much smoother than before.
- Cover and let the dough rest for another 30 minutes.
- Repeat the same stretch and folds 3 more times, for a total of 4 sets. Cover the dough and wait for at least 30 minutes of rest in between each set.
- Once you have completed the final set of stretch and folds, cover the dough and let it rest for the remainder of the bulk fermentation on your counter top, about 9-11 more hours if the dough is kept at 68-70 degrees F.
Bulk fermentation
- Now this is the most finicky part of sourdough. There isn’t a set time for your bulk ferment. It is greatly dependent on the temperature of your environment. The warmer it is, the faster your dough will ferment. The opposite is true for cooler temperatures.
- In an environment of 68-70 degrees, doughs will typically bulk ferment for 9-11 hours more after the stretch and folds, but again, you will have to look for the signs that your dough is done fermenting, rather than the clock. Warmer temperatures will be faster, while cooler temperatures will be slower.
Here’s what to look for:
- -The dough should have increased in size by at least 75% and be domed on top.-The dough looks light, and jiggles when the bowl is shaken.-The dough should easily pull away from the bowl.-There should be visible bubbles in the dough and on top.-The dough doesn’t tear when you do a windowpane test
- Pre-shape
- Once your dough has completed it's bulk ferment, it's time to move on to the pre-shape.
- With slightly wet fingers, gently release the dough from the sides of the bowl. Be careful not to pop all of those lovely bubbles! Tilt the bowl and leave gravity to do the work to move the dough on the counter.
- Shape the dough by doing another round of stretch and folds until you have gone full circle.
- With a bench scraper or your hands, turn the dough upside down, so the seam is now on the counter. Cover the dough with the bowl and let it rest for 30 minutes.
- While you are waiting for the dough to rest, prepare your proofing basket. This can either be a banneton or a small mixing bowl lined with a tea towel. The purpose of this proofing basket is to keep the tight shape that you will create, so make sure you are using a standard bowl that is small enough to help keep the shape.
- Dust the banneton or the tea towel with flour (most will say to use rice flour, but I have used just regular all-purpose flour) to prevent sticking.
Chai Filling
- Add the softened butter to a bowl of a stand mixer with the paddle attachment. This can also be done with a hand mixer.57 grams unsalted butter
- To the butter, add dark brown sugar, cinnamon, ginger, cardamon, nutmeg, cloves, allspices, and flour. Mix on medium/low speed for about 2 minutes, or until the ingredients are combined and a paste is formed.55 grams dark brown sugar **see notes, 3 grams ground cinnamon, 1 gram ground ginger, .5 grams ground cardamon, .5 grams ground nutmeg, .5 grams ground cloves, .5 grams ground allspice, 5 grams all-purpose flour
Final shape
- After 30 minutes of rest, flip the dough, with the seamed side up. Gently stretch the dough into a large rectangle, this is called lamination technique. Refer to the pictures above. Be careful not to stretch any sections of the dough too thinly.
- Spread half of the chai filling over the top of the dough.
- Next, take the left side of the dough and fold it towards the middle. Spread 1/2 of the remaining chai filling on top of this new section.
- Finally, take the right side of the dough and fold that towards the middle on top of the last section, like a tri-fold. Spread the remaining chai filling on top. Now, roll up the dough, starting with the part of the dough closest to you.
- Gently cup your hands around the dough ball. Turn the ball in a clockwise motion about a quarter turn and then softly pull the dough towards you. Do this repeatedly until you see the dough form a tighter and more round shape.
- With a bench scraper or just your hands, carefully scope up the dough and lay it upside down (seed side down) into your floured proofing basket and cover it with a plastic bag or a shower cap.
Cold Proof
- Place your proofing basket in the fridge to cold proof for 8-72 hours.Placing your dough in the fridge slows down the fermentation process, which deepens the flavors of your loaf. It also gives you flexibility in when you want to bake your bread.But don’t wait too long! If left in the fridge for too long, your dough will over-ferment, causing the dough to not be able to rise while baking.
Score
- Thirty minutes before baking, place the dough in the freezer. This helps with the scoring design.
- At the same time, place your Dutch oven in your oven and preheat to 500 degrees F. Allow the Dutch oven to preheat for at least 30 minutes.
- Place a piece of parchment paper on your workspace and gently flip the banneton upside down over the parchment paper. Since you dusted the banneton, your dough should slowly release and fall onto the parchment paper, landing in the middle with the floured side facing up.
- With a lame / razor blade or sharp knife, score a crescent moon shape on top of the dough. This is necessary for your bread to be able to expand while baking.
- Grab the corners of the parchment paper and carefully place the Sourdough Chai dough into your preheated Dutch Oven and cover with the lid.
- Lower the temperature to 450 degrees F and bake the Chai Sourdough Bread covered for 30 minutes. Then remove the lid of the Dutch oven and continue to bake the bread for an additional 10-15 minutes with the lid off at 425 degrees F. Keep an eye on the chai filling. If they are browning too much, cover the Dutch oven with aluminum foil while the bread continues to bake.
- Once golden brown, with an internal temperature of at least 205 degrees F, remove the Dutch Oven from your oven.
- Using the corners of the parchment paper, lift the sourdough bread out of the Dutch oven and place it onto a wire rack to cool.
- Allow your homemade bread to cool for at least 1 hour before cutting into it. (I know!! How can you possibly wait when it looks and smells so good?! But trust me, if you cut in too soon, your masterpiece will turn gummy.) While the loaf cools, I highly suggest mixing up some whipped chai butter!
Whipped Chai Butter
- Add the softened butter to a bowl of a stand mixer with the whisk attachment. This can also be done with a hand mixer.57 grams salted butter **see notes
- To the butter, add powdered sugar, cinnamon, ginger, cardamon, nutmeg, cloves, and allspices. Mix on medium/low speed for about 3 minutes, or until the butter is looking light and fluffy.55 grams powdered sugar, 3 grams ground cinnamon, 1 gram ground ginger, .5 grams ground cardamon, .5 grams ground nutmeg, .5 grams ground cloves, .5 grams ground allspice
- Once the hour is up, slice into your work of art, slather on some of the chai butter, and enjoy!
Notes
Ingredients
Dark Brown Sugar - Light brown sugar can be used as a substitute Salted butter - If using unsalted butter, add 1 gram or 1/8 teaspoon of salt.How to Store
Store sourdough at room temperature in a paper or linen bag for up to three days to maintain its crust. Avoid plastic, as it traps moisture and makes the bread soggy. For longer storage, freeze the sliced or whole loaf by wrapping it in plastic wrap and placing it in a freezer bag for up to three months. Thaw at room temperature or reheat in a toaster or oven. *Refrigeration is not recommended, as it dries out the bread and affects texture.FAQs
Can I add the spices to the dough?
While you might be tempted to incorporate spices directly into the dough for flavor, it’s best to avoid this. Cinnamon has antimicrobial properties that can slow down the fermentation in a loaf. Instead, use spices like ground cinnamon, ginger, and cardamom in your chai spice mix for the chai filling to enhance the taste without hindering the dough's rise.Can I use different types of flour for this recipe?
Absolutely! This recipe uses bread flour, but feel free to experiment with other options like whole wheat or rye flour. Just remember that different flours will change the texture and flavor of your bread. Whole wheat flour will make for a denser loaf, while rye flour can add a bit of an earthy taste. If you decide to try a new flour, you might want to adjust the hydration by adding a little more water or cutting back on the flour slightly to keep the dough balanced. This recipe card was updated on 03/12/26.Nutrition
Serving: 1loaf | Calories: 3353kcal | Carbohydrates: 548g | Protein: 64g | Fat: 102g | Saturated Fat: 60g | Polyunsaturated Fat: 7g | Monounsaturated Fat: 25g | Trans Fat: 4g | Cholesterol: 245mg | Sodium: 3926mg | Potassium: 768mg | Fiber: 17g | Sugar: 163g | Vitamin A: 2885IU | Vitamin C: 1mg | Calcium: 289mg | Iron: 7mg
Tried this recipe?Please leave a comment on the blog or share a photo on Instagram!