Easy Sourdough Burger Buns (Same-Day Recipe!)
This post may contain affiliate links. Please read our disclosure policy.
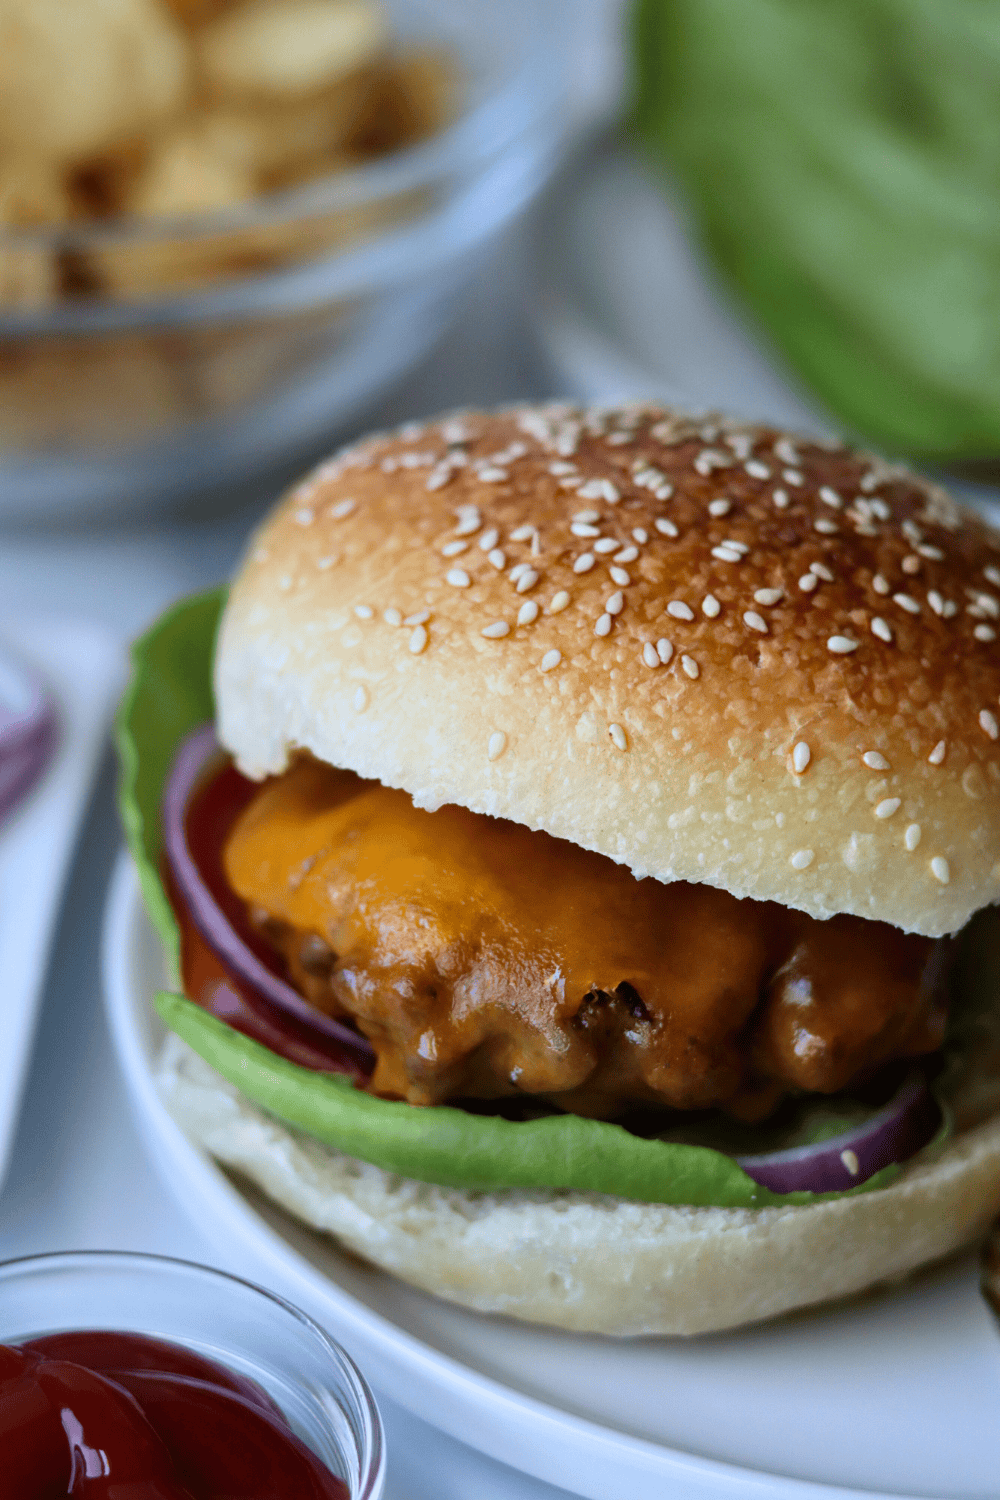
Burger season just hits different with homemade buns, and these 100% Sourdough Burger Buns are worth making from scratch. They bake up soft, fluffy, and golden brown with just enough sourdough tang to make any burger taste even better.
This recipe works as an easy same-day bake or an overnight option, so you can fit it into whatever your schedule looks like. And if you need buns a little faster, my Sourdough Discard Burger Buns are ready in about 2 hours. Plus my Sourdough Hot Dog Buns use a similar dough and are perfect for cookout season too.
Quick Look: Sourdough Burger Buns Recipe
- Prep Time: 1 hour
- Rise Time: 4 hours
- Bake Time: 20 minutes
- Total Time: 5 hours 20 minutes
- Servings: 10 burger buns
- Calories: ~275 kcal per serving (based on nutrition panel)
- Cook Method: Baked
- Flavor Profile: Fluffy, soft, and slightly rich with a subtle tang from active sourdough starter. The perfect homemade bun for juicy burgers straight off the grill.
- Difficulty: Intermediate — Requires kneading, shaping, and two rises, but can be done in the same day!
SUMMARIZE & SAVE THIS CONTENT ON
Why You’ll Love This Sourdough Burger Buns Recipe
- Soft and Delicious-These burger buns come out of the oven golden brown with a soft, fluffy crumb that holds up under a juicy burger and all the toppings you can pile on. Once you’ve made your own, store-bought buns just don’t cut it anymore. If you want warm homemade burger buns on the table in just 2 hours, these Sourdough Discard Burger Buns don’t require the full fermentation and taste just as great.
- Same-day recipe-Get the dough going in the morning and you’ll have fresh burger buns on the table by dinner. If you need more flexibility, prep the dough the night before and bake the next day. These Sourdough Dinner Rolls are another same-day sourdough bake that comes together in the same amount of time.
- Simple — The process starts with kneading the dough with a dough hook attachment for 10 to 15 minutes, or until you have a smooth, strong dough that bakes up soft and chewy. You don’t absolutely need a stand mixer; you can knead the dough by hand for the same amount of time and get the same result. If you don’t do tons of sourdough baking, there’s no reason to spend money on one. These Sourdough Ciabatta Rolls are another easy sourdough bread recipe to try next.
Ingredients & Substitutions
* To find precise measurements, scroll to the bottom of this post to find the recipe card*
- Milk – Using milk instead of water gives these buns a softer crumb. You can also swap it for a non-dairy alternative like almond milk.
- Butter – Salted or unsalted butter will work just fine.
- Sourdough Starter – These buns use active sourdough starter to rise, not commercial yeast like store-bought buns.
- Sugar – Just a touch of sweetness goes into the dough. If you don’t have white sugar, cane sugar or honey work just as well.
- Eggs – You’ll need one large egg plus an extra egg yolk. Together they make the crumb extra soft and chewy.
- Flour – All-purpose flour works in a pinch, but bread flour is the better choice here. It has a higher protein content than all-purpose flour and gives you a fluffier, softer bun.
- Salt – Any unrefined salt will do, but my favorite is Redmond’s Unrefined Salt for the extra minerals.
Same-day Bake
|
Time |
Process |
|---|---|
|
9:00 AM |
Prepare the dough |
|
9:30 AM |
Knead |
|
10:00 AM |
First rise |
|
2:00PM |
Shape, then second rise |
|
4:00 PM |
Bake and enjoy! |
Two-day Bake
|
Time |
Process |
|---|---|
|
5:00 PM |
Prepare the dough |
|
5:30 PM |
Knead |
|
6:00 PM |
First rise |
|
10:00 PM |
Shape, then pop into the fridge overnight |
|
NEXT DAY |
|
|
1:00 PM |
Remove from the fridge for second rise |
|
4:00 PM |
Bake and enjoy! |
How to Make the Best Sourdough Burger Buns
Make the Dough
- Heat the butter and milk in a small saucepan on the stove or in a small bowl in the microwave until warm but not hot. If the butter and milk mixture gets above 120°F it will kill the sourdough starter, so let it cool down a little before adding it to the dough.
- Meanwhile, add the active starter, egg, egg yolk, and sugar to the bowl of a stand mixer fitted with a paddle attachment. Mix on low speed until combined, then gradually add the melted butter and warm milk.
- Add the flour and salt to the wet ingredients and mix on low speed. Stop to scrape the sides of the bowl to make sure all the flour is incorporated, then continue mixing on low for 1 to 2 minutes.
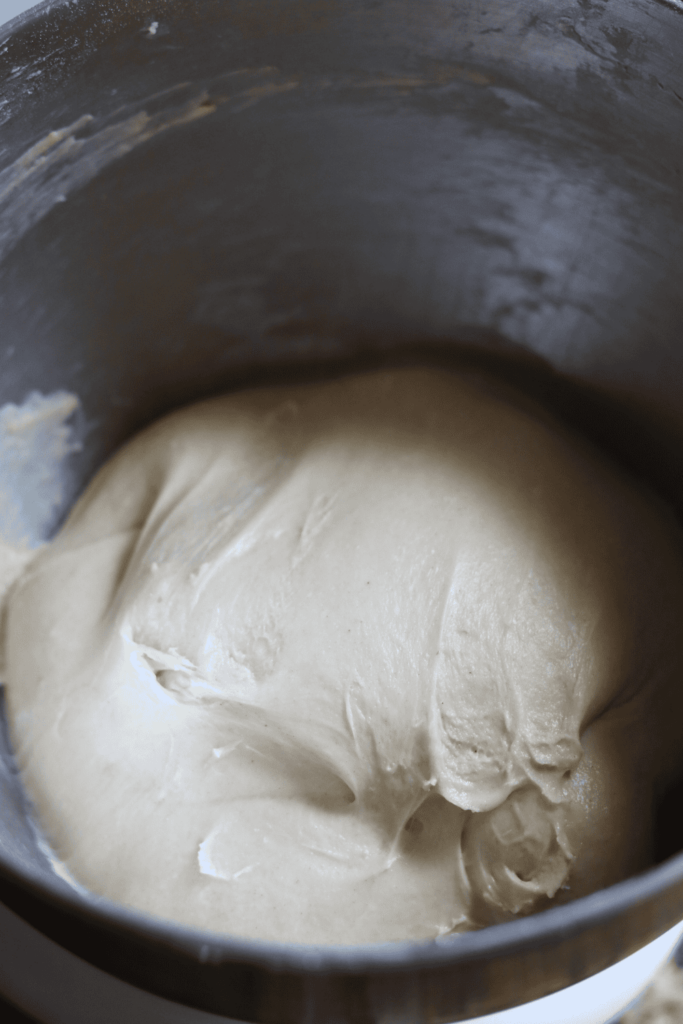
- The dough will look thick and sticky, similar to a cake batter. Cover with plastic wrap, a kitchen towel, or a reusable shower cap and let the dough rest for 30 minutes. This rest gives the gluten time to relax before kneading.
Knead
- Step After 30 minutes, remove the cover and knead the dough with the dough hook attachment for 10 to 15 minutes.
- The dough is ready when it is smooth and shiny and pulls away completely from the sides of the bowl. To confirm, do the windowpane test. Pull off a small piece of dough and stretch it thin. If the light passes through without the dough tearing, it has been kneaded enough. If it tears, keep going.
- Transfer the dough to a lightly greased bowl. I like to use butter or olive oil. Cover it again..
Bulk Fermentation
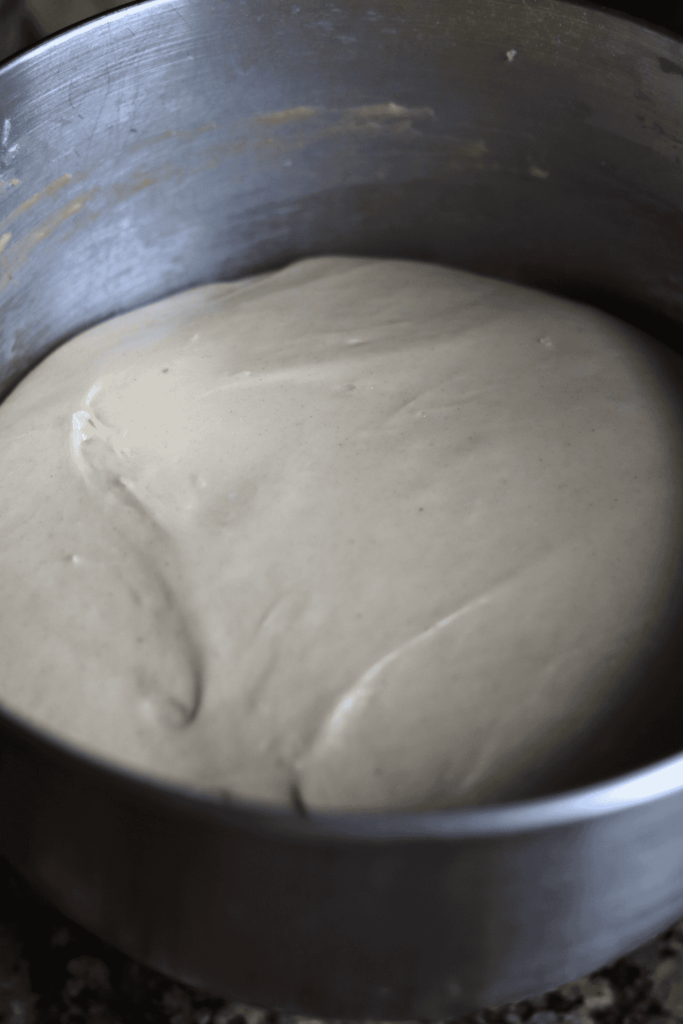
- Place the dough in a warm spot in your kitchen and let it rise until it has at least doubled in size.
- In a 68°F kitchen, the first rise should take about 3-4 hours. Rise times depend on the temperature of your kitchen. A colder kitchen means a longer rise, and a warmer kitchen will speed things up. A warm spot could be on top of your refrigerator, in a cabinet, or in an oven that is turned off with just the light on.
Shape
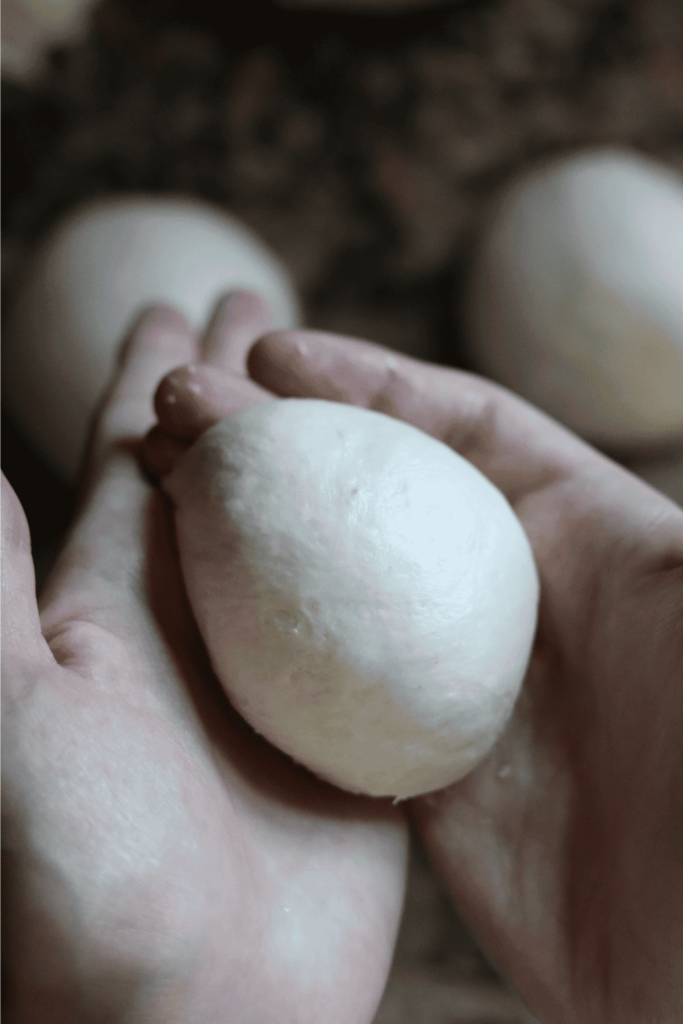
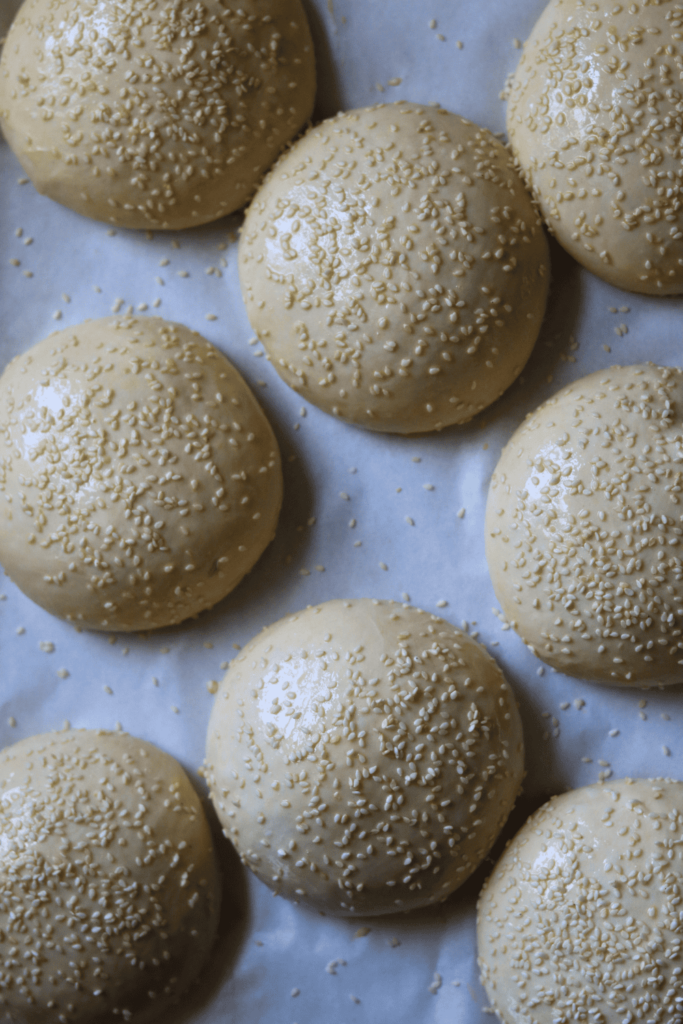
- Once the dough has at least doubled in size, punch the top of the dough to remove all the air bubbles, then turn it out onto a lightly floured surface.

- Gently stretch the dough into a rough rectangle. Using a bench scraper or serrated knife, cut the dough into 8 equal pieces for large burger buns, about 130g each, or 10pieces for standard-sized burger buns, about 106g each.
- Cover the shaped buns with a damp tea towel or another large baking sheet and let them rise for their second proof. The final rise takes about an hour, but rise times depend on the temperature of your kitchen. The buns are ready when they look puffy and have grown noticeably.
- If you’re not ready to bake the same day, cover the shaped buns with plastic wrap and store them in the fridge overnight. A few hours before you’re ready to bake, pull them out of the fridge and let them rise. Since the dough is cold, the rise will take longer than usual.
Bake
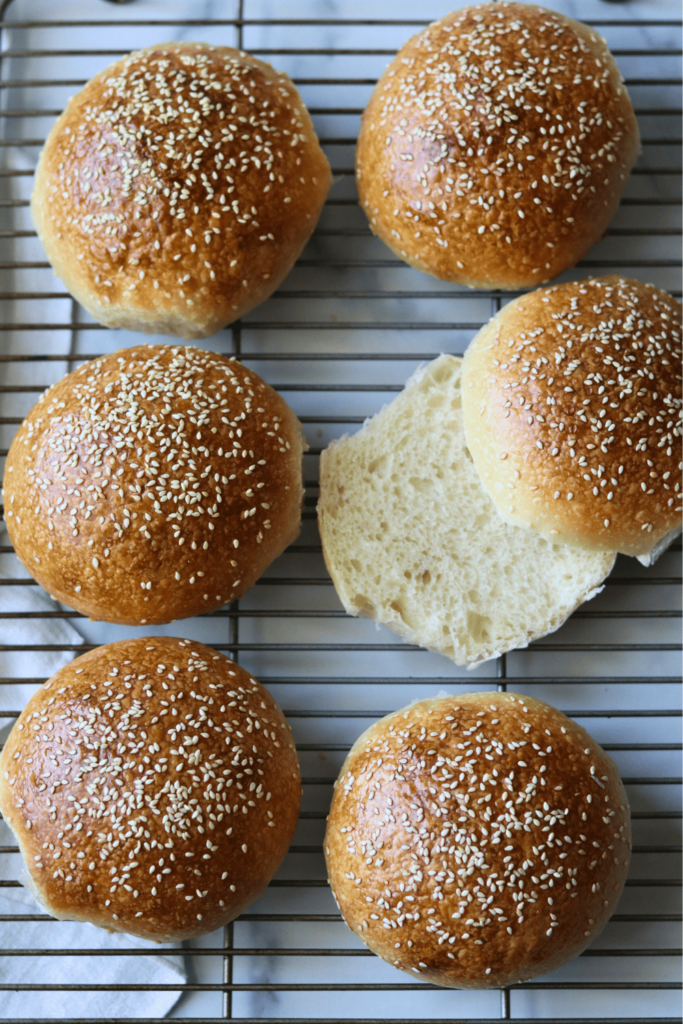
- Preheat the oven to 375°F. In a small bowl, whisk together an egg and a splash of water, then brush the top of each bun with the egg wash using a pastry brush. This is what gives them that golden brown finish. Top with sesame seeds if you like.
- Bake for 20 to 25 minutes or until the buns are golden brown. Check on them around 15 minutes in. If they’re browning too quickly, cover them loosely with aluminum foil and continue baking. The buns are fully cooked when the internal temperature reaches 190°F.
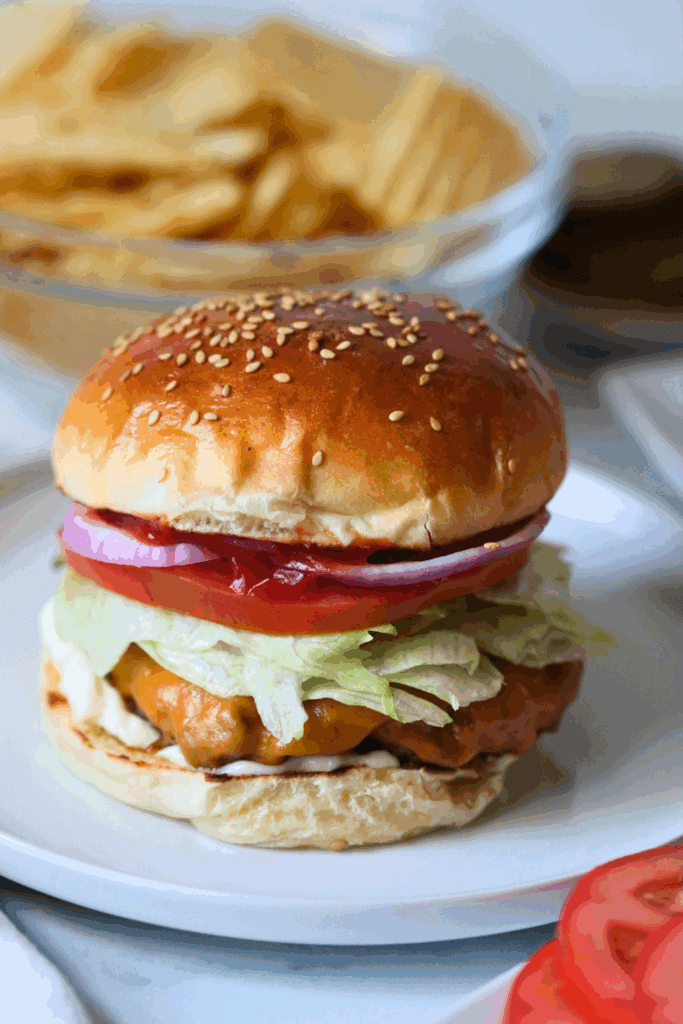
- Remove the buns from the oven and let them cool on a wire rack. Serve at room temperature with a juicy grilled burger and toppings of choice.
McKenna’s Helpful Tips
- Use a kitchen scale. I know it’s tempting to just scoop and go, but good bread baking really does come down to precise measurements. A kitchen scale takes the guesswork out of it and makes a difference in how the bun dough turns out.
- Don’t let your butter and milk mixture get too hot. Anything above 120°F will kill your sourdough starter and your dough won’t rise. Heat it up, then give it a few minutes to cool down before you add it to the rest of the ingredients.
- Do the windowpane test before you stop kneading. Pull off a small piece of dough and stretch it thin. If the light passes through without it tearing, you’re good to go. If it tears, keep kneading. It’s the most reliable way to know your dough is ready.
- Weigh your dough pieces before you shape them. Cut the dough into 8 pieces at about 130g each for large burger buns, or 10 pieces at about 106g each for standard sized buns. Weighing them out means every bun comes out the same size and bakes evenly.
- Brush the tops with butter the second they come out of the oven. It’s one of those steps that’s easy to skip but really makes a difference. That butter softens the tops and keeps the buns from getting tough as they cool down.
How to Store
Store leftover buns in an airtight container or ziplock bag for up to 2 days. If your kitchen runs warm, keep them in the fridge and pop one in the microwave for 30 seconds when you’re ready to eat it. These freeze really well too, up to 2 months. Just make sure they’re fully cooled before you bag them up, because warm buns trap steam in the bag and mess up the texture. Squeeze out all the air, seal it up, write the date on it, and thaw on the counter when you’re ready.
Sourdough Burger Buns FAQs
Yes, all-purpose flour swaps in at a 1:1 ratio. That said, bread flour is the better choice here. It has a higher protein content than all-purpose flour and gives you a softer, fluffier bun.
Yes. Once the buns are shaped, cover them with plastic wrap and store them in the fridge overnight. A few hours before you’re ready to bake, pull them out and let them rise. Since the dough is cold, the rise will take longer than usual.
No. If you don’t have a stand mixer, knead the dough by hand for the same amount of time, 10 to 15 minutes.
Sesame seeds are a great option. Just sprinkle them on top of the egg wash right before the buns go in the oven so they stick.
More Sourdough Buns Recipe Like This


If you tried this Sourdough Burger Buns recipe or any other recipe on my blog, please leave a 🌟 star rating and let me know how it went in the📝 comments below. Thanks for visiting!
Sourdough Burger Buns Recipe
Enter your email below, and we’ll send it straight to your inbox! Plus, you’ll get my newest sourdough recipes and best tips every week!
Ingredients
- 240 grams warm milk 1 cup
- 57 grams unsalted butter 4 Tablespoons
- 200 grams active sourdough starter 1 cup
- 24 grams sugar 2 Tablespoons
- 1 egg
- 1 egg yolk
- 500 grams bread flour 3 1/2 + 1 Tablespoon
- 11 grams salt 2 teaspoons
- egg wash
Instructions
MAKE THE DOUGH:
- Heat the butter and milk in a small saucepan on the stove or in a small bowl in the microwave until warm, but not hot. If the liquid is too hot (hotter than 120 degrees F), it can kill the sourdough starter. I like to heat and then cool slightly before adding to the dough.240 grams warm milk, 57 grams unsalted butter
- Meanwhile, add the active starter, egg, egg yolk, and sugar to the bowl of a stand mixer with a paddle attachment. Mix on low speed until combined, then gradually add the warm milk and melted butter mixture.This can also be done by hand. Increase the knead time to 15-18 minutes.200 grams active sourdough starter, 24 grams sugar, 1 egg, 1 egg yolk
- To the wet ingredients, add the bread flour and salt and mix again on low speed. Stop to scrap the sides of the bowl to incorporate all the dry ingredients and then continue to mix on low for 1-2 minutes.500 grams bread flour, 11 grams salt
- The dough will look thick and sticky, like a cake batter. Cover with plastic wrap or a clean kitchen towel, and allow the dough to rest for 30 minutes. This allows the gluten to rest before kneading.
KNEAD:
- After 30 minutes, remove the cover and knead the dough with the dough hook attachment at medium speed for 10 – 15 minutes.You’ll know the dough has been kneaded completely when it is smooth and shiny. The dough will completely pull away from the sides of the bowl when it is being kneaded, tacky, not sticky, to the touch, and it will pass the windowpane test.This means when you stretch a small section of dough into a thin film, the light will be able to pass through without the dough tearing. If this is accomplished, the dough has been properly kneaded.
- Remove the dough and place it in a lightly greased straight-edge bowl. I like to use butter or olive oil. Cover it again.I love using this straight-edge bowl because it allows me to clearly see when the dough is done rising.
BULK FERMENTATION:
- Place the dough in a warm place in your kitchen and allow the dough to at least double in size. In my 70 degree F kitchen, the first proof should take about 3-4 hours. The bulk fermentation time greatly depends on the temperature of your kitchen. If you have a colder kitchen, the rise time will take longer. If your kitchen runs warm, the first rise will take less time.
SHAPE:
- Once the dough has at least doubled in size, punch the top of the dough to remove all the air bubbles. Then, place the dough on a clean work surface.
- Gently stretch the dough into a rough rectangle shape. With a bench scraper or serrated knife, cut the dough into 8 equal pieces for large burger buns (about 130g each) or 10 standard sized burger buns (about 106g each).
- Pull the corners of the dough towards the center, flip, and then roll each piece of dough into a round, tight ball. Place the shaped buns on a baking sheet lined with parchment paper. Repeat until all the rolls are shaped.
- Once shaped, cover the shaped buns with a plastic cover or plastic wrap, and let the dough rest for its second rise. In my 70 degree F kitchen, the second rise took about 1-2 hours. You will know the final proof is complete when the burger buns have grown and look puffy.
- Not ready to bake these in the same day? No worries! See directions in the Notes section below.
BAKE:
- Preheat the oven to 375 degrees F.
- In a small bowl, whisk together an egg and a splash of water, then brush the top of each bun with the egg wash with a pastry brush. This will help them to get that lovely golden brown color. Top with sesame seeds, if desired.egg wash
- Bake for 20-25 mins minutes or until the homemade Sourdough Burger Buns are golden brown. I like to check the buns around 15 minutes. If they are starting to brown too quickly, cover the buns with aluminum foil and continue to bake. Completely cooked buns will have an internal temperature is 190 degrees F.
- Remove the Sourdough Burger Buns and let them come to room temperature before slicing and topping them with your meat and toppings of choice!

The best! That’s all I have to say!!! Truly, the greatest roll I’ve made with my starter. I did do the egg wash with black sesame seeds and now wish I would’ve made them beef on weck style…excuse to make more! Used honey in my recipe and made the rolls larger so I got 8. Rolls have a hard outside to them and so soft inside…can handle what ever you put in between! Thank You for this recipe!
This is the kind of comment that makes my day! Really appreciate you taking the time to write this, thank you!
I thought I had enough active starter but I lack about 1/4 cup. I need the buns tonight. Can I half the recipe? I only need 4 buns.
If I can what do I do about the egg and egg yolk?
Great question—and you can absolutely make this work! Yes, you can halve the recipe. For the egg, the easiest way is to lightly whisk it first, then use about half. For the extra yolk, you can either: use about half the yolk, or add a small splash of milk instead if measuring feels tricky. It doesn’t have to be exact—the dough is pretty forgiving. You should still end up with great buns for tonight! Enjoy!
I just made these and they turned out beautiful, soft,fluffy. They do take time so don’t rush things in my opinion. Amazing.
I’m so glad they turned out soft and fluffy for you. And you’re absolutely right, this is one of those recipes where giving it the time it needs really pays off. I appreciate you making them and coming back to share your experience!
If I shaped these differently would they work for hot dog buns?
Absolutely! You can find my Sourdough Hot Dog Buns recipe here for step-by-step directions on how to shape!
Would I be able to half this recipe? Should Inonky add one egg instead of one and a yolk? Thanks!
Yes, you can absolutely halve this recipe! If you’re cutting it in half, using one whole egg (instead of one egg + one yolk) and reduce the water by 12 grams. This will help to keep the hydration and richness balanced.
Looking forward to making these-was curious if wanting to add in like cheese&jalapeño when would that inclusion be added? Thank you &bless!!!
That sounds delicious! You can add the cheese and jalapeños right at the end of mixing or during the kneading. This helps evenly distribute the mix-ins without overworking the dough. Just be sure to pat the jalapeños dry if they’re from a jar so they don’t add extra moisture. Enjoy those flavorful buns!
Hello!
I am using all purpose flour and my bag says 1 cup=120 grams. So 3.5 cups would =420g. Should I still do the 500grams the recipe calls for?
Thank you! Love all of your recipes
Great question! I always go by weight rather than cup measurements, since cup weights can vary from brand to brand and even how you scoop. For my recipes, 1 cup = 140g, so you’ll want to follow the 500g listed in the recipe for the most accurate results. And thank you so much! Thrilled to hear you are loving the recipes.
Hello!
I’m in the process of making these buns. I tried following the recipe but I couldn’t get my dough to stop clinging to the sides of the mixing bowl by following the recipe only. It was necessary to add another full cup of flour gradually to get the dough to release from the sides and form a ball that did not stick to the sides. I did try to follow the recipe quite accurately and had a problem at the point where the recipe says:
KNEAD:
5. After 30 minutes, remove the cover and knead the dough with the dough hook attachment at medium speed for 10 – 15 minutes.
6. You’ll know the dough has been kneaded completely when it is smooth and shiny. The dough will completely pull away from the sides of the bowl when it is being kneaded, tacky, not sticky, to the touch, and it will pass the windowpane test.
This means when you stretch a small section of dough into a thin film, the light will be able to pass through without the dough tearing. If this is accomplished, the dough has been properly kneaded.
7. Remove the dough and place it in a lightly greased bowl. I like to use butter or olive oil. Cover it again.
Thanks so much for the feedback and for giving the recipe a try! Dough can definitely vary based on things like flour brand, humidity, and how packed the flour was when measured—so it’s totally okay that you needed to add a bit more. It sounds like you handled it perfectly by adjusting as needed to get that smooth, elastic dough. I hope the buns turned out great in the end! Let me know how they baked up!
Never mind I think the same day is the one for the hot dog rolls I made, so that is what I will do this appears the same so will do these today, hot dog was delicious
Hope you love it!
Loved the hot dog rolls I was hopibg to use that recipe to make hamburger buns they were fantastic, these recipe does not look the same do not care about the overnight ferment, should I just use the hot dog recipe for hamburger buns,
Planning to make both hamburger and hot dog rolls tomorrow. First time making rolls!! If I plan on doing the 2 day bake, do I let the shaped dough rise again before placing in the fridge or do I let them rise again after taking the out of the fridge? Thanks!!
Hi Stephanie! How exciting! I hope you loved both of these recipes. For the second rise, you’ll want to pul the buns out the fridge and let them rise at room temperature, then bake.
Hi this recipe looks amazing and I can’t wait to try! Is there a way to substitute the milk and butter for nondairy options?
Hi Esther! Thank you! I’m so glad you’re excited to try them! Yes, you can absolutely substitute both the milk and butter with non-dairy options. I recommend using an unsweetened non-dairy milk (like almond, oat, or soy) and a stick-style vegan butter for best results. The texture should still be soft and fluffy! Let me know how they turn out for you—I’d love to hear.
I love these burger buns! So easy to make and delicious. Even my kids ate them! P.S. THANK YOU for how you write your recipes–I so appreciate that you have written in the instructions the ingredients and their quantities with each step so I don’t have to keep flipping back and forth to the front page (and so I don’t forget an ingredient!) Also, thank you for providing how many grams of dough for the different bun sizes. Your recipes are all amazing and the formatting keeps me coming back for more because they’re so easy to follow (and the food is always delicious!). <3
You are so welcome, Jenna! So glad the recipe is easy to follow and that everyone enjoyed them! Thank you so much for your sweet comment.
This is my favorite sourdough brioche hamburger bun recipe! Can I make this as a loaf of brioche bread? Do you know what temp or how long it should take to bake?
Hi Pamela! I’m so glad you love the burger bun recipe! I haven’t personally tested it as a loaf, but it should work well. I’d recommend shaping it into a loaf and placing it in a greased 9×5-inch pan. As for baking, a typical brioche loaf bakes at 350°F (175°C) for about 30-40 minutes. You’ll want to check for a deep golden brown color and an internal temperature of around 190-200°F (88-93°C) to ensure it’s fully baked. If you give it a try, I’d love to hear how it turns out!
Hi, love your recipes and would love to try this. Is there anyway to do it without a stand mixer? Thanks!
Hi Stacee! Thank you so much! I’m glad you are enjoying the recipes! Yes, you can mix and knead the dough by hand. But to forewarn you, it will be a bit of an arm workout, but not impossible. Continue to knead the dough until it passes the windowpane test. Enjoy!
I have been making these without a stand mixer. I am likely not kneading the dough enough so the end product may not be perfect but it’s still been delicious and better than anything I could buy.
Aren’t they so tasty? We can’t get enough of them! Thank you so much for sharing!