How to Make Sourdough Pizza Dough (Easy Recipe)
This post may contain affiliate links. Please read our disclosure policy.
This homemade sourdough pizza made us forget takeout entirely. Pizza has become a weekly thing at our house. The dough is easy to mix, bakes fast, and gives you a crust that’s chewy with a light, puffy edge and a crisp bottom. It has that mild sourdough tang and an open, airy look around the rim. You can prep it ahead and keep it in the fridge for up to 3 days, which makes weekend pizza night simple. It bakes well on a pizza stone in a home oven or an outdoor pizza oven and is ready in minutes. The recipe makes dough for four personal pizzas, so everyone can add their own toppings and cheese. A pizza stone or pizza steel helps, but you can still make great pizza without one. We also make this Sourdough Discard Pizza and this Breakfast Pizza with a sourdough crust, and you can try these ones too.

MY LATEST VIDEO
Why You’ll Love This Recipe:
- Gut-friendly recipe: Sourdough pizza dough is alive with natural yeast and lactic acid bacteria, which slowly ferment the flour. This process helps break down some of the phytic acid in the flour, making minerals like iron and magnesium easier for your body to absorb. The slow fermentation also partially breaks down starches and gluten, so the dough feels lighter and can be easier on your stomach than quick-rise yeast dough, all while keeping that familiar tangy flavor and chewy texture.
- Personal Pizza: This sourdough pizza recipe makes enough dough for four personal pizzas, so everyone can top theirs just the way they like. You can also split it into eight smaller portions for mini pizzas that kids will love. You can spread tomato sauce, pesto, or even a white garlic sauce, then layer on mozzarella, cheddar, or a mix of your favorite cheeses. Top it with pepperoni, sausage, roasted veggies, fresh herbs, or even fruit for a sweeter twist. The dough is easy to shape thin and crisp or thicker and puffier, so each pizza can be exactly what you and your family want. For more homemade pizza ideas, check out my Easy Sourdough Pizza Crust Recipe (uses discard), my Breakfast Pizza with a Sourdough Pizza Crust, or my Easy Sourdough Fruit Pizza Recipe.
- Make Ahead Convenience: One of the best things about this dough is how easy it is to prep ahead. Mix it a day or two before pizza night and let the natural fermentation do its work in the fridge. You can even freeze portions for later. That way, last-minute dinners are a breeze since the dough is already fermented, flavorful, and ready to shape and top.
Ingredients & Substitutions
* To find precise measurements, scroll to the bottom of this post to find the recipe card*
- Active Sourdough Starter: Active and bubbly so it can naturally leaven the dough, giving your crust that mild tang and chewy texture.
- Water: Make sure the water isn’t boiling (no hotter than 120°F), which protects the starter while hydrating the flour for a smooth, pliable dough.
- Olive Oil: Extra virgin olive oil adds richness, keeps the dough soft, and helps create a tender, chewy crust that browns nicely.
- Bread Flour: Bread flour has a higher protein content than all-purpose flour, which develops more gluten for that light, puffy edge and chewy interior.
- Salt: To enhance the overall flavor, balancing the natural tang of the sourdough and strengthening the dough’s structure.
Baking Time For Sourdough Pizza Dough
|
Time |
Process |
|---|---|
|
8:00 PM |
Mix Dough |
|
8:30 PM |
First Stretch and Fold |
|
10:00 PM |
First Rise |
|
NEXT DAY |
|
|
6:00 AM |
Store Sourdough Pizza Dough in the fridge |
|
4:00 PM |
Remove Pizza Dough from the fridge |
|
5:00 PM |
Shape and bake |
How to Make Sourdough Pizza Dough Recipe
Mix the Dough
- To a large bowl, add the sourdough starter, olive oil, and warm water.
- Mix with a Danish Dough Whisk or by hand until the water is milky white and most of the starter is dissolved.
- Pour the bread flour and salt into the wet ingredients. Mix until all of the dry ingredients have been incorporated. The dough will be sticky.
- Cover the dough with a tea towel or bowl cover. I like to use a reusable shower cap and leave it to rest for at least 30 minutes.
Stretch and Folds
- Once the Sourdough Pizza Dough has rested for at least 30 minutes, remove the bowl cover.
- Wet your finger to prevent the dough from sticking. Scrape the sides of the bowl with a bowl scraper. Then, take a small piece of the dough with your fingers, pull it up towards you, and then fold it on top of the pizza dough. Turn the dough a quarter turn clockwise and perform the same stretch and fold.
- Continue to do this motion about 10–15 times. The dough will begin to look smoother.
- Cover the bowl again and allow it to rest for another 30 minutes.
- Repeat the stretch and fold three more times so you end up with four total sets, letting the dough rest for 30 minutes between each set.
Bulk Fermentation
- After finishing all the stretch and folds, cover the bowl and let the dough rise until it’s doubled in size. In my kitchen, around 70°F, this usually takes 6 to 8 hours. If your kitchen is warmer, the dough will rise faster, so keep an eye on it and adjust the timing as needed.
Cold Rise
- Once the dough has doubled in size, remove it from the bowl. Use a bench scraper to divide the dough into four equal pieces and gently shape each piece into a dough ball. Place the dough balls in a reusable container, cover, and store in the fridge until you’re ready to use them. This pizza dough can be stored for up to 36 hours.
Shape
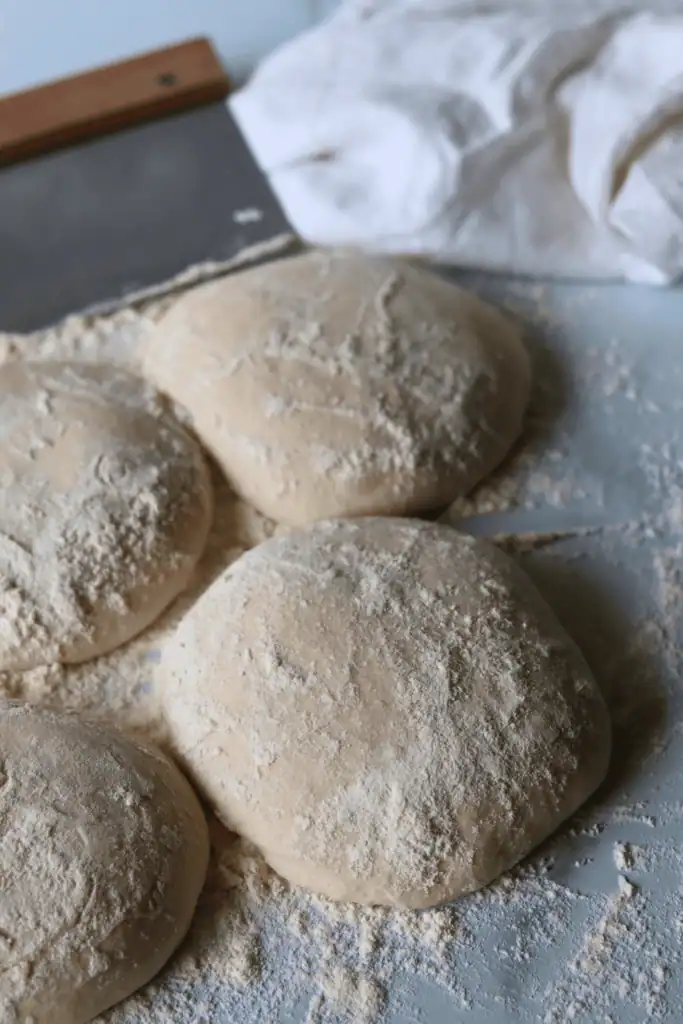
- About an hour before you’re ready to bake the sourdough pizza, carefully remove the dough from its container without disturbing the bubbles and place it on a generously floured workspace. Tip: I like to flour my hands so the dough doesn’t stick. Sprinkle plenty of flour on top of the dough and cover the mounds with a tea towel.
- Let the dough rest for at least an hour to reach room temperature. It should puff up slightly and look light and airy. While the dough is resting, place your pizza stone in the oven and preheat to 550 °F for at least an hour before baking.
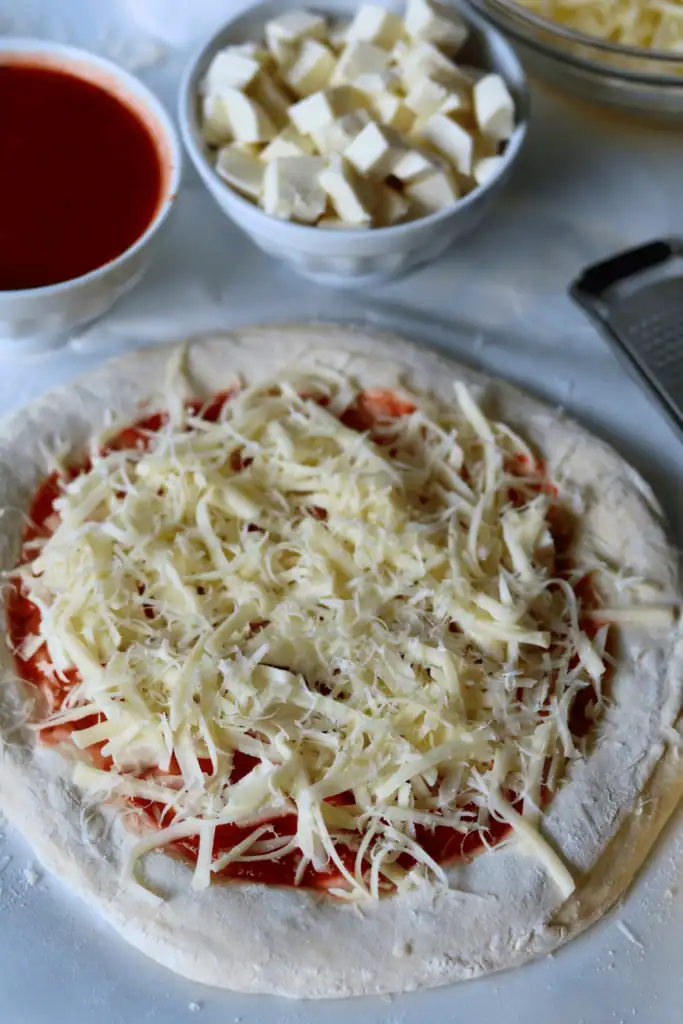
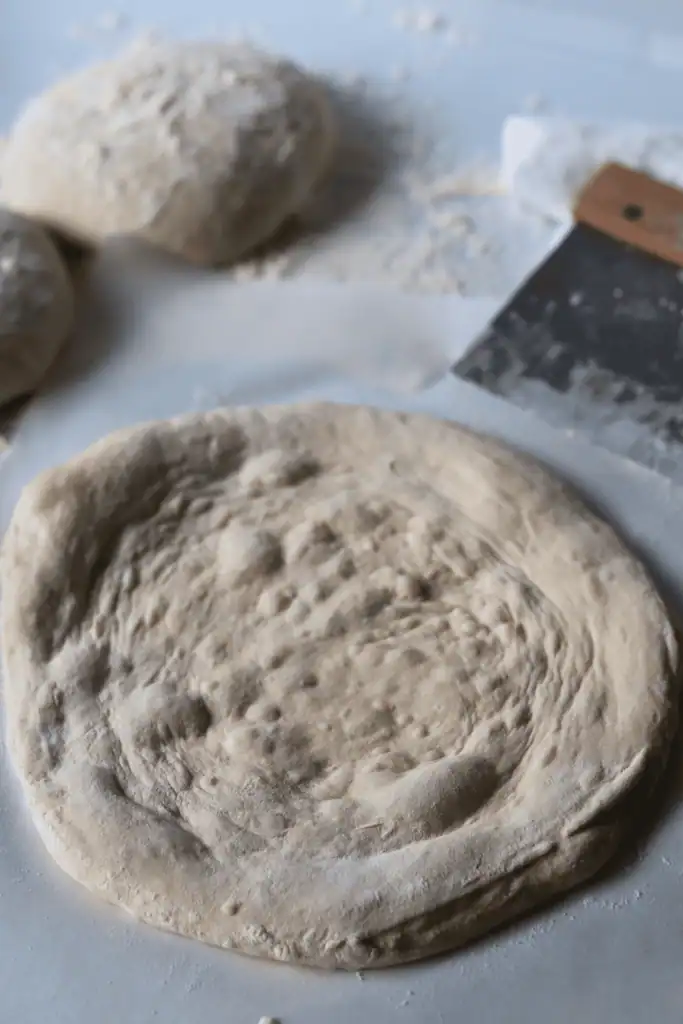
- After an hour, gently place a dough ball on a piece of parchment paper. Carefully shape it into a 9-inch round, being careful not to pop all those air bubbles. Once shaped, top with about 2 tablespoons of sauce, your cheese of choice, and any toppings you like, using your heart as a guide.
- Use a pizza peel to slide the parchment and pizza onto the preheated pizza stone. Bake for 5–6 minutes, or until the cheese is melted and the crust is golden brown. Transfer to a cutting board, slice, and enjoy!
McKenna’s Helpful Tips
- Label everything – Always mark your stored dough with the date so you can easily track freshness.
- Keep it covered – Make sure the dough is well-covered to prevent it from drying out or forming a crust.
- Avoid over-proofing – When refrigerating or freezing, check that the dough doesn’t overproof, which can change the texture and flavor of your sourdough pizza crust.
- Rest the dough – Let the dough sit for at least 30 minutes before starting stretch-and-folds to relax the gluten.
- Stretch and fold – Perform 4 sets of stretch-and-folds with 30-minute rests between each to build structure and smooth the dough.
- Handle gently – When shaping, be careful not to pop the air bubbles to keep the crust light and airy.
How to Store
Room temperature for immediate use: If you plan to use the dough within a few hours, store it at room temperature. Place it in a covered bowl or under a damp cloth to prevent drying out. Note that this method is less ideal for longer storage and can lead to over-proofing if left out too long.
Refrigeration: Put the dough in a reusable container and store it in the fridge for up to 3 days. This keeps it ready for a quick pizza night or a tasty pan pizza the next morning. You can also keep it in a bowl tightly covered with plastic wrap. Before baking, let it come to room temperature, and give it a little extra time to rise if needed.
Long-term Storage: Divide the dough into equal portions for individual pizzas. Wrap each portion tightly in plastic wrap and place the wrapped dough in a freezer bag or airtight container. It can be frozen for up to 3 months.
Thawing: To use frozen dough, move it to the fridge about 24 hours before you plan to bake. Let it thaw and rise in the refrigerator. You can also thaw it at room temperature for a few hours, but make sure it has time to rise properly before shaping and baking.
Sauce, Cheese, and Topping Ideas
- Sauce ideas: Use about 2 tablespoons of your favorite sauce per pizza. Tomato sauce works classic, pesto adds a fresh, herbal punch, and white garlic sauce gives a rich, creamy option. Keep it light so the crust stays airy and crispy.
- Cheese options: Layer mozzarella for that classic melt and stretch, cheddar for sharper flavor, or a mix of both. Use just enough to cover the sauce without weighing down the dough.
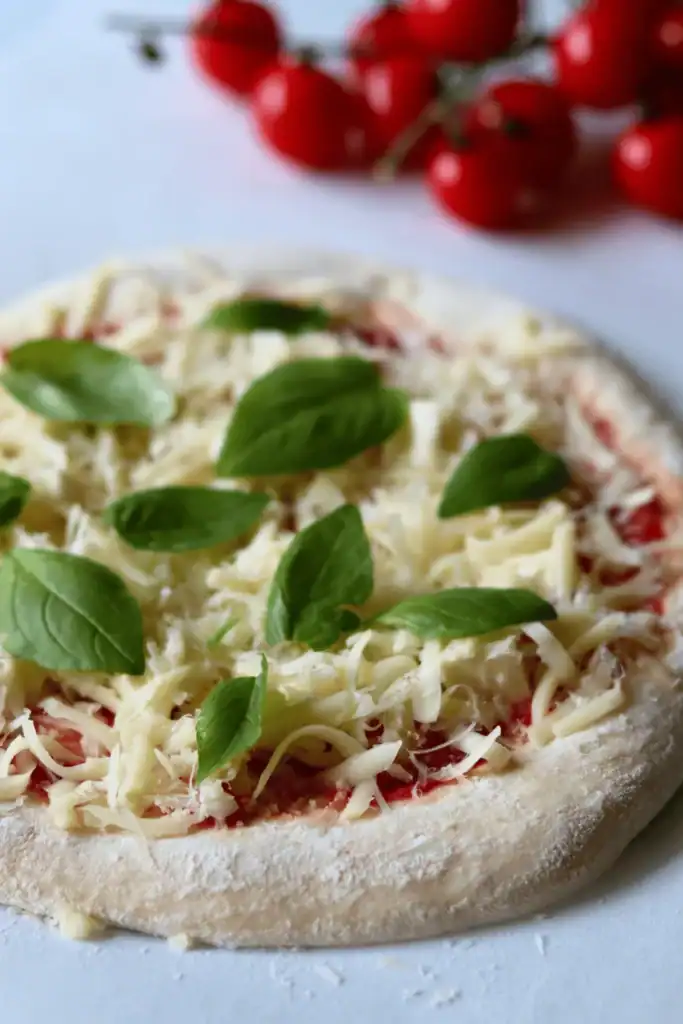
- Topping suggestions: Add protein or veggies to taste. Pepperoni and sausage are great for a savory bite, roasted vegetables keep it lighter, fresh herbs add aroma, and fruit gives a sweet contrast. Spread toppings evenly and don’t overload the pizza to maintain the airy, puffy crust.

FAQs
Yes, you absolutely can! Instead of a pizza stone, you can use a 12-inch cast iron skillet. You could also cook the pizza dough in a nonstick skillet, then carefully transfer the pizza onto a baking sheet lined with parchment paper before broiling to melt the cheese on top.
Be gentle. Flour your hands and your work surface lightly, and don’t press down too hard. Those little bubbles give you a light, airy crust that makes homemade pizza so good.
Yes! After the bulk fermentation, divide the dough into four pieces, wrap each tightly, and pop them in a freezer bag. They’ll keep up to three months. Thaw in the fridge for about 24 hours before using, and let them rise a bit so you don’t lose that airy texture.


Sourdough Pizza Dough Recipe
Enter your email below, and we’ll send it straight to your inbox! Plus, you’ll get my newest sourdough recipes and best tips every week!
Ingredients
Sourdough Pizza Crust
- 100 grams active and bubbly starter 1/2 cup
- 350 grams warm water 1 1/2 cups
- 30 grams extra virgin olive oil 3 Tablespoons
- 500 grams bread flour 3 1/2 cups
- 10 grams salt 1 1/2 teaspoons
Pizza Toppings
- pizza sauce
- freshly shredded cheese
- your choice of toppings
Instructions
Mix the Dough:
- To a straight-edge bowl, add the sourdough starter, olive oil, and warm water.I love using this bowl because it allows me to clearly see when the dough is done rising.100 grams active and bubbly starter, 350 grams warm water, 30 grams extra virgin olive oil
- Mix with a Danish dough whisk or by hand until the water is milky white and most of the starter is dissolved.
- Pour the bread flour and salt into the wet ingredients. Mix until all of the dry ingredients have been incorporated. The dough will be sticky.500 grams bread flour, 10 grams salt
- Cover the dough with the bowl cover or plastic wrap and leave it to rest for at least 30 minutes.
Stretch and Folds:
- Once the Sourdough Pizza Dough has rested for at least 30 minutes, remove the bowl cover.
- Wet your finger to prevent the dough from sticking.
- Scrape the sides of the bowl with a bowl scraper. Then, take a small piece of the dough with your fingers, pull it up towards you, and then fold it on top of the pizza dough. Turn the dough a quarter turn clockwise and perform the same stretch and fold.
- Continue to do this motion about 10–15 times. The dough will begin to look smoother.
- Cover the bowl again and allow it to rest for another 30 minutes.
- Repeat the same stretch and fold at least 3 more times (for a total of 4 sets of stretch and folds) with 30 minutes of rest in between each set.
Bulk Fermentation:
- After all of the stretch and folds are complete, cover the bowl and allow the dough to ferment until the dough has doubled in size, at room temperature in a warm spot. In my 70 degrees F kitchen, this took an additional 6-8 hours. Warmer temperatures will rise faster, so adjust appropriately to your environment.
Cold Rise:
- Once the dough has doubled in size, remove the dough from the bowl. With a bench scraper, divide the dough into 4 equal pieces and gently shape into dough balls. Place each dough ball in a greased, reusable container, cover and place the sourdough pizza crust in the fridge until ready to use.You can store this pizza dough for up to 36 hours.
Shape:
- One hour or so before you are ready to bake the Sourdough Pizza, carefully remove the sourdough pizza dough from its container (without disturbing all the bubbles) and place it on a generously floured workspace. I like to flour my hands to prevent the dough from sticking!
- Sprinkle the top of the dough with plenty of flour and cover the mounds with a clean tea towel.
- Let the dough rest for at least 1 hour to come to room temperature, or until it has puffed up and looks light and airy.This will take longer in a cool kitchen, while the dough will rise faster in a warmer kitchen.
- In the meantime, place your pizza stone into the oven and preheat at 550 ºF for at least 1 hour before cooking.
- Don't have a pizza stone? I share other cooking options below!
Cook:
- Once the dough looks light and airy, gently place one dough ball onto a piece of parchment paper. Carefully shape the dough ball into a 9-inch round (you don’t want to pop all of those air bubbles!) Once shaped, top with 2 Tablespoons of sauce, cheese and all your favorite toppings, measure with your heart!pizza sauce, freshly shredded cheese, your choice of toppings
- Slide the piece of parchment paper with the pizza on top of the pizza peel, then carefully slide the parchment paper onto the pizza stone. Bake for 5-6 minutes or until the cheese is melty and the crust is gold brown. Transfer the cooked pizza to a cutting board, slice and enjoy!

I absolutely love this recipe! I have tried it how many times and it always turns out great!! Do you think it would be possible to use this recipe to make stromboli?
I’m so thrilled it’s been a consistent favorite for you! Yes, this should absolutely work! I would just roll it out a bit thicker than you would for pizza, add your fillings, then roll it up tightly and seal the edges well. If you give it a go, I would love to know how it goes!
So yummy delicious and easy to follow! I have no pizza stone so went the alt route using the non stick skillet then putting it in the oven to broil!
So glad it worked out! Using a skillet and finishing under the broiler is a great alternative to a pizza stone—it gives you a nice crisp bottom and a beautifully bubbly top. Thanks for sharing your method!
I allowed the recipe to bulk ferment to double, then shaped and refrigerated the balls. 27 hours later I removed them from the fridge to bring to room temperature so that I could stretch them and bake however, after two hours they had over proofed. As soon as I touched they collapsed. What could have been the issue?
I’m so sorry to hear that! It sounds like your dough may have fermented a little too long before going into the fridge, or it over proofed on its second rise. The time suggestions given is from my 70 degree F kitchen. If you kitchen runs warmer, this will speed up the rise time. I hope that helps troubleshoot — pizza dough can be finicky, but once you dial in your timing it turns out beautifully every time!
Can i put it in the cast iron without parchment paper and apply oil instead to make it crunchy?
My husband said, “I feel like I’m at a restaurant.” I think we found our go-to pizza crust!
Wow, what a compliment! So glad it brought that restaurant vibe to your kitchen—this crust is definitely a keeper!
When you say “Slide the piece of parchment paper with the pizza on top of the pizza peel”: can I just use some flour on the peel and slide it into the pizza stone without using parchment paper? That’s how I do it when I make regular pizza.
Also, from this recipe you get 4 individual balls. What size of pizza do you get from each ball? 8″ probably?
Yes, you can absolutely skip the parchment and slide the pizza directly onto the stone if that’s how you normally do it! Just make sure to dust your peel generously with flour or semolina so the dough releases easily. I include the parchment as an easy option for those who prefer a little less mess or worry about sticking.
Each dough ball makes about an 8–9 inch pizza — perfect for individual portions!
I’ve tried several sourdough pizza dough recipes and this one is IT. Crispy yet chewy and I love that it puffs up. The taste is on point, too!
I love hearing this! I am so thrilled that you love this recipe as much as we do. Thank you so much for sharing!
I put the dough in my cast iron and baked it for about 5 minutes before putting the toppings on. I baked it about 15 minutes longer with the topping and it came out perfect. Light and chewy crust, and it tasted amazing. This will be my go to pizza dough recipe from now on.
I’m so glad you loved it and that the par-bake method worked perfectly for you! Light, chewy, and flavorful is exactly what I aim for with this crust. Thanks so much for sharing your process—I’m thrilled this will be your go-to pizza dough recipe!