Jalapeño and Cheddar Sourdough Bread Recipe
This post may contain affiliate links. Please read our disclosure policy.
This Jalapeño and Cheese Sourdough Bread is the kind of loaf that instantly makes a regular slice of sourdough feel more exciting. It has a crisp golden crust, soft chewy center, melty cheddar throughout, and just the right amount of jalapeño heat in every bite.
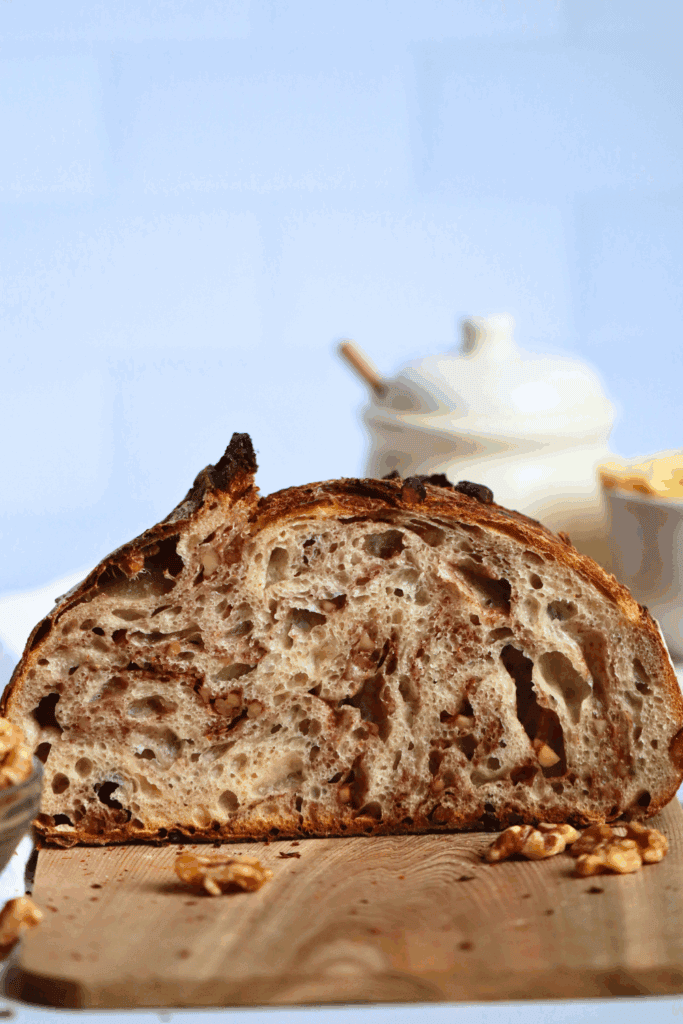
Made with active sourdough starter, this loaf has beautiful oven spring and that classic sourdough flavor with a savory, spicy twist. And just like my Roasted Garlic Sourdough Bread and Caramelized Onion Sourdough Bread recipes, this savory sourdough makes the best Sourdough Grilled Cheese! serve it with soup, or keep it simple with a little butter—either way, it’s one of those breads you’ll want to make again and again.

Quick Look: Jalapeño and Cheddar Sourdough Bread
- Prep Time: 12 hours
- Rise Time: 8 hours
- Bake Time: 40 minutes
- Total Time: 20 hours 40 minutes
- Servings: 1 loaf
- Calories: ~2,330 kcal per loaf
- Cook Method: Baked in a Dutch oven
- Flavor Profile: Chewy and flavorful with a crispy crust, melty cheddar pockets, and a mild kick of jalapeño in every bite. Makes the most delicious grilled cheese sandwich!
- Difficulty: Intermediate — A multi-day sourdough loaf with stretch and folds, mix-ins, shaping, and cold proofing. Best for bakers with some sourdough experience!
SUMMARIZE & SAVE THIS CONTENT ON
Why You’ll Love This Jalapeño and Cheddar Sourdough Bread Recipe
- Easy to Make: No complicated steps or fancy ingredients here. You just mix the bread dough in a large bowl with a dough whisk, perform a few sets of stretch and folds, and let your active sourdough starter do the rest. If you’re new to sourdough, start with my Easy Sourdough Bread for Beginners.
- Packed with Flavor: The combination of spicy fresh jalapeños and sharp cheddar cheese takes classic sourdough up a notch. Every bite delivers melty cheese and a kick of heat wrapped in a golden brown crust. For more savory inclusions ideas, check out my Sourdough Inclusions Guide.
- Completely Customizable: Use fresh or pickled jalapeños, swap in sharp or aged cheddar, or mix in extra spices to make it your own. You can even add roasted garlic like I do in my Roasted Garlic and Rosemary Sourdough Bread.
Ingredients & Substitutions
* To find precise measurements, scroll to the bottom of this post to find the recipe card*
- Bread flour: Bread flour is best when it comes to making sourdough recipes, however you can use all-purpose flour instead. The higher protein percentage in flour gives the dough its strength so that it can rise to great heights and give you the best results.
- Water: Use room temperature, filtered water for consistent results.
- Active sourdough starter: This recipe calls for an active and bubbly sourdough starter. This post shows you how you can easily make your own sourdough starter today.
- Salt: Any unrefined salt will do, but my favorite is Redmond’s unrefined salt for some extra minerals!
- Jalapenos: You can use fresh or pickled and sliced or diced jalapenos. If you are using fresh, remove the seeds and slice into thin rounds or dice into ¼-inch pieces. If using pickled jalapenos, be sure to remove as much of the liquid as possible. I prefer the diced jalapenos so you get a little bit in each bite.
- Cheddar cheese: For the best flavor, opt for sharp or aged cheddar cheese. It and the jalapenos are the star, so use quality ingredients here. If you choose to use shredded cheddar cheese, don’t use pre-shredded cheese as those are covered in “anti-caking” ingredients.
Baking Schedule #1
|
Time |
Process |
|---|---|
|
DAY 1 |
Feed starter before bed in a 1:4:4 ratio (ex. 10g starter /40g flour /40g water) |
|
DAY 2 |
|
|
9:00 AM |
Mix Ingredients |
|
9:30 – 11:30 AM |
Stretch and fold every 30 minutes |
|
11:30 AM |
Continue the bulk fermentation |
|
9:00 PM |
Preshape |
|
9:30 PM |
Inclusions, shape and place in the fridge |
|
DAY 3 |
Score and bake in the morning |
This schedule is made for a 68-70 degree environment. Higher temperatures will quicken the process. Lower temperatures will lengthen the process.
Baking Schedule #2
|
Time |
Process |
|---|---|
|
DAY 1 |
Feed starter so that it’s active, bubbly, and at its peak (4-12 hours before mixing dough) |
|
8:00 PM |
Mix Ingredients |
|
8:30 – 10:00 PM |
Stretch and fold every 30 minutes |
|
10:00 PM |
Continue the bulk fermentation |
|
DAY 2 |
|
|
8:00 AM |
Pre-shape |
|
8:30 AM |
Inclusions, shape and place in the fridge |
|
Score and bake in the evening |
*This schedule is made for a 68-70 degree environment. Higher temperatures will quicken the process. Lower temperatures will lengthen the process.
How to Make Jalapeño and Cheddar Sourdough Bread
Make the Dough
- In a large mixing bowl, add active, bubbly sourdough starter and room temperature, filtered water. Mix with a dough whisk or your hand until it looks like a milky liquid.
- To the wet ingredients, add the bread flour and salt. Be sure to mix until all of the flour is incorporated. The dough will look shaggy, not like a uniform dough ball.
- Cover the bowl with plastic wrap and let the dough rest for at least 30 minutes before you move on to the next step.
Stretch and Folds
- With slightly wet fingers, scrape the dough away from the bowl. Grab a section of the dough and stretch the bread dough above your bowl. Then fold over on top of the dough.
- Rotate your bowl clockwise a quarter of the way and repeat identical stretch and fold. Repeat the process until you come full circle, about 4-6 times. You will notice the dough will start to look much smoother than before.
- Cover the dough again and let it rest for another 30 minutes.

Mix-Ins
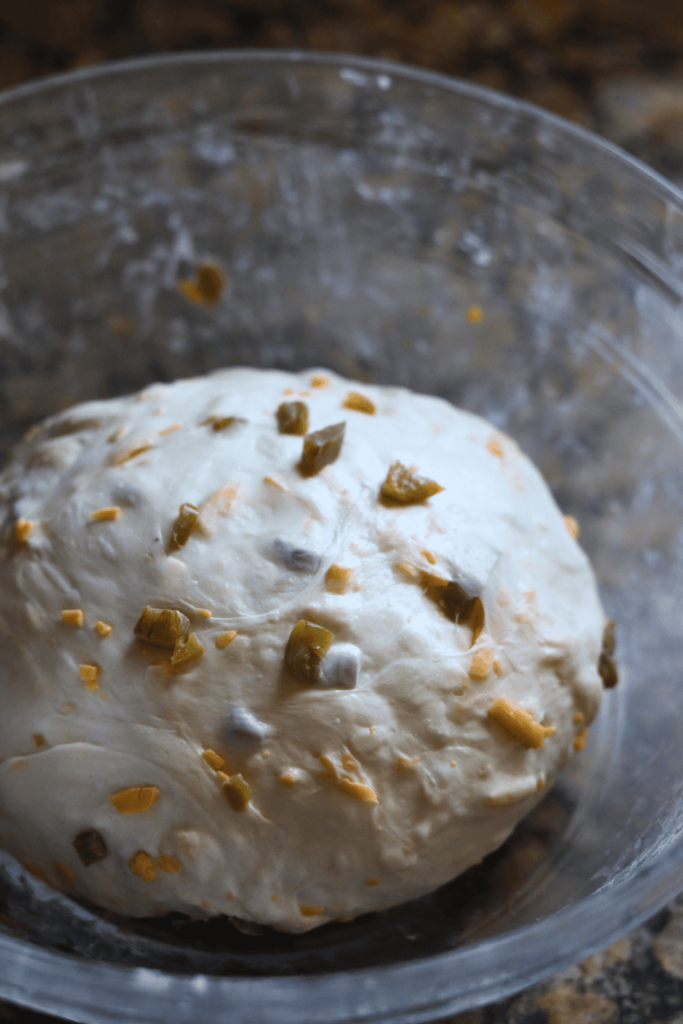
- Before starting your second set of stretches and folds, prepare the jalapeños and cheddar cheese.
- To the top of your dough, sprinkle 1/3 of each mix-in. Perform one stretch and fold. Then add another 1/3 of the mix-ins, do one more stretch and fold. Add the last 1/3 of the mix-ins and complete the rest of the stretch and folds.
- Cover and let rest for another 30 minutes.
- Repeat the identical stretch and fold two more times (for a total of 4 different rounds), waiting at least 30 minutes between each stretch and fold.
- Cover the dough after each stretch and fold.
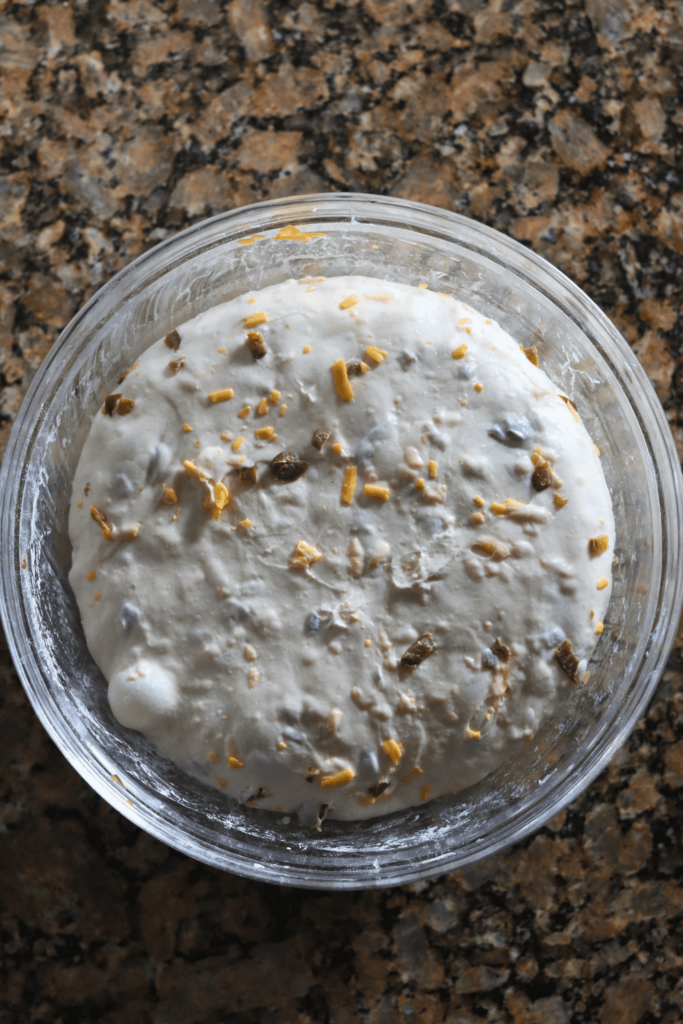
- Once you have completed the final set of stretch and folds, cover the dough and let it rest for the remainder of the bulk fermentation on your counter.

Bulk Fermentation
- Now this is the most finicky part of sourdough. There isn’t a set time for your bulk ferment. It is greatly dependent on the temperature of your environment. The warmer it is, the faster your dough will ferment. The opposite is true for cooler temperatures.
- In an environment of 68-70 degrees, doughs will typically bulk ferment for 10-12 hours more after the stretch and folds, but again, you will have to look for the signs that your dough is done fermenting, rather than the clock. Warmer temperatures will be faster, while cooler temperatures will be slower.
**Here’s what to look for:
- The dough should have increased in size by at least 75% and be domed on top.
- The dough looks light, and jiggles when the bowl is shaken.
- The dough should easily pull away from the bowl.
- There should be visible bubbles in the dough and on top.
- The dough doesn’t tear when you do a windowpane test
Pre-shape
- Once the dough has completed the bulk rise, it’s time to shape. With slightly wet fingers, gently release the dough from the sides of the bowl.
- Shape the dough by doing another round of stretch and folds until you have gone full circle.
- With a bench scraper or your hands, turn the dough upside down, so the seam is now on the counter. Cover the dough with the bowl and let it rest for 30 minutes.
- While you are waiting for the dough to rest, prepare your proofing basket.


Final shape
- After 30 minutes of rest, gently cup your hands around the dough ball. Turn the ball in a clockwise motion about a quarter turn and then softly pull the dough towards you. Do this repeatedly until you see the dough form a tighter and more round shape.
- With a bench scraper or just your hands, carefully scoop up the dough and lay it upside down (seed side up) into your floured proofing basket and cover it with a plastic bag or a shower cap.
Cold proof
- Place your proofing basket in the fridge to cold-proof for 8-72 hours.

Score
- 30 minutes before baking, place the dough in the freezer.
- At the same time, place your Dutch oven in your oven and preheat to 500 degrees F. Allow the Dutch oven to preheat for at least 30 minutes.
- Place a piece of parchment paper on your workspace and gently flip the banneton upside down over the parchment paper.
- With a lame / razor blade or sharp knife, score a crescent moon shape on top of the dough.
- Grab the corners of the parchment paper and carefully place the Sourdough Jalapeño & Cheddar dough into your preheated Dutch Oven and cover with the lid.

Bake
- Lower the oven to 450 degrees F and bake the bread covered for 27 minutes. Then remove the lid of the Dutch oven and continue to bake the bread for an additional 10-15 minutes with the lid off at 425 degrees F.
- Once golden brown, remove the Dutch oven from your oven.
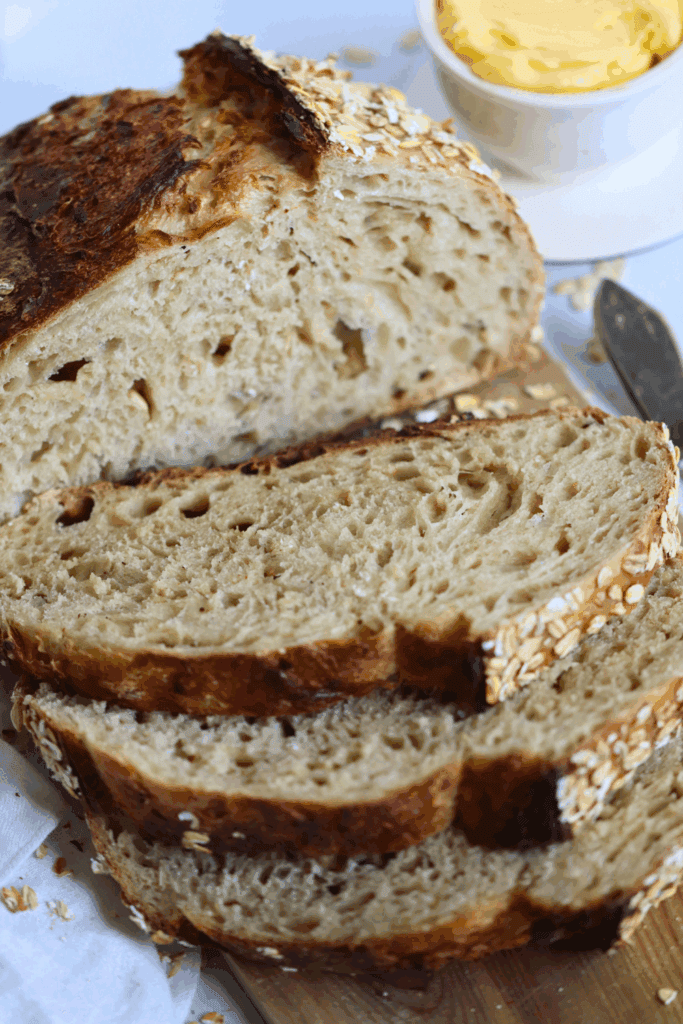
Using the corners of the parchment paper, lift the sourdough bread out of the Dutch oven and place it onto a wire rack to cool. - Allow your homemade bread to cool for at least 1 hour before cutting into it.
- After an hour, slice into your work of art and slather on some butter, and enjoy!

McKenna’s Helpful Tips
- Use quality cheese: Opt for a block of sharp cheddar and shred it yourself rather than using pre-shredded cheese, which contains anti-caking agents that can affect melting. If you love cheesy bread, also try my Cheese and Garlic Pull-Apart Sourdough Bread.
- Drain pickled jalapeños well: If you prefer pickled jalapeños for a tangy flavor, be sure to pat them dry with a paper towel before adding them to the dough. Excess moisture can throw off your dough hydration and affect the bulk fermentation.
- Add inclusions during stretch and folds: Sprinkle 1/3 of your jalapeños and cheese on top of the dough before each stretch and fold for even distribution. I use the same method for my Sourdough Caramelized Onion Bread recipe! For a deeper dive into when and how to add mix-ins, read my Sourdough Inclusions Guide.
- Watch your bulk fermentation: In a 70 degree F kitchen, look for a 75% dough rise, visible bubbles, and a jiggly texture rather than relying on the clock. Kitchen temperature plays a huge role. For a full breakdown, check out my Sourdough for Beginners guide.
- Serve it in a bread bowl: This jalapeño cheddar sourdough makes an incredible vessel for chili or soup. Shape a smaller round loaf and hollow it out after baking, just like my Easy Sourdough Bread Bowls.
How to Store
Keep leftovers in an airtight container or tightly wrapped in plastic wrap at room temperature for up to 2 days. If you need to store it longer, refrigerate for up to a week.
You can also freeze it. Wrap slices individually in plastic wrap, then place them in a freezer bag. For the best texture, reheat in the oven or toaster.

Jalapeño and Cheddar Sourdough Bread FAQs
Yes, you can use all-purpose flour, but bread flour gives better structure and rise due to its higher protein content. Your loaf may turn out slightly softer with all-purpose flour. If you’re looking for a beginner-friendly recipe that uses either flour, try my Easy Sourdough Bread for Beginners.
Either works! Fresh jalapeños give a sharper heat, while pickled ones add a tangy flavor. Just be sure to drain pickled jalapeños well to avoid excess moisture in the bread dough. I prefer the diced fresh jalapeños so you get a little bit of heat in each bite.
Look for signs like a 75% dough rise, visible bubbles, a jiggly texture, and dough that pulls away easily from the bowl. If it tears during a windowpane test, your homemade sourdough bread dough needs a little more time. For a complete guide to reading your dough, visit my Sourdough for Beginners post.


If you tried this Cheddar and Jalapeno Sourdough Bread recipe or any other recipe on my blog, please leave a 🌟 star rating and let me know how it went in the📝 comments below. Thanks for visiting!
Jalapeño and Cheddar Sourdough Bread Recipe
Enter your email below, and we’ll send it straight to your inbox! Plus, you’ll get my newest sourdough recipes and best tips every week!
Ingredients
- 50 grams active sourdough starter 1/4 cup
- 350 grams filtered water, room temperature 1 1/2 cups
- 500 grams bread flour 3 1/2 cups
- 10 grams salt 1 1/2 teaspoons
- 70 grams fresh or pickled jalapeños, diced 1/3 cup
- 113 grams cheddar cheese, freshly shredded 1 1/2 cups
Instructions
Make the Dough
- In a straight-edge bowl, add active, bubbly sourdough starter and room temperature, filtered water. Mix with a Danish dough whisk or your hand until it looks like a milky liquid.I love using this straight-edge bowl because it allows me to clearly see when my dough is done rising.50 grams active sourdough starter, 350 grams filtered water, room temperature
- To the wet ingredients, add the bread flour and salt. Be sure to mix until all of the flour is incorporated. The dough will look shaggy, not like a uniform dough ball.10 grams salt, 500 grams bread flour
- Cover the bowl with plastic wrap and let the dough rest for at least 30 minutes before you move on to the next step.
Stretch and Folds
- With slightly wet fingers, scrape the dough away from the bowl. Grab a section of the dough and stretch the bread dough above your bowl. Then fold over on top of the dough.
- Rotate your bowl clockwise a quarter of the way and repeat identical stretch and fold.
- Cover the dough again and let it rest for another 30 minutes.
Mix-Ins
- Before starting your second set of stretches and folds, prepare the jalapeños and cheddar cheese.
- You can use fresh or pickled jalapeños. If you are using fresh, remove the seeds and slice into thin rounds or dice into ¼-inch pieces.If using pickled, be sure to remove as much of the liquid as possible. I like to pat them dry with some paper towel. Similar to the fresh, you can add sliced or diced pickled jalapeños depending on your preference.I prefer the diced jalapeños so you get a little bit in each bite.113 grams cheddar cheese, freshly shredded, 70 grams fresh or pickled jalapeños, diced
- To the top of your dough, sprinkle 1/3 of each mix-in. Perform one stretch and fold. Then add another 1/3 of the mix-ins, do one more stretch and fold. Add the last 1/3 of the mix-ins and complete the rest of the stretch and folds. Some inclusions may break through the dough, totally fine. They will continue to be mixed in during your next rounds of stretch and folds.
- Cover and let rest for another 30 minutes.
- Repeat the identical stretch and fold two more times (for a total of 4 different rounds), waiting at least 30 minutes between each stretch and fold. Cover the dough after each stretch and fold.
- Once you have completed the final set of stretch and folds, cover the dough and let it rest for the remainder of the bulk fermentation on your counter, about 9-11 more hours if the dough is kept at 68-70 degrees F.
Bulk fermentation
- Now this is the most finicky part of sourdough. There isn’t a set time for your bulk ferment. It is greatly dependent on the temperature of your environment. The warmer it is, the faster your dough will ferment. The opposite is true for cooler temperatures.
- In an environment of 68-70 degrees F, doughs will typically bulk ferment for 9-11 hours more after the stretch and folds, but again, you will have to look for the signs that your dough is done fermenting, rather than the clock. Warmer temperatures will be faster, while cooler temperatures will be slower.
Here’s what to look for:
- -The dough should have increased in size by at least 75% and be domed on top.-The dough looks light, and jiggles when the bowl is shaken.-The dough should easily pull away from the bowl.-There should be visible bubbles in the dough and on top.-The dough doesn’t tear when you do a windowpane test
Pre Shape
- With slightly wet fingers, gently release the dough from the sides of the bowl. Be careful not to pop all of those lovely bubbles! Tilt the bowl and leave gravity to do the work to move the dough on the counter.
- Shape the dough by doing another round of stretch and folds until you have gone full circle.
- With a bench scraper or your hands, turn the dough upside down, so the seam is now on the counter. Cover the dough with the bowl and let it rest for 30 minutes.
- While you are waiting for the dough to rest, prepare your proofing basket. This can either be a banneton or a small mixing bowl lined with a damp tea towel. The purpose of this proofing basket is to keep the tight shape that you will create, so make sure you are using a standard bowl that is small enough to help keep the shape.
- Dust the banneton or the tea towel with flour (most will say to use rice flour, but I have used just regular all-purpose flour) to prevent sticking.
Final Shape
- After 30 minutes of rest, flip the dough, with the seamed side up.
- Gently pull the bottom of the dough towards you, then fold it towards the center of the dough. Pull the right side of the dough out and fold towards the center. Repeat with the left side. Finally, stretch the top of the dough away from you and fold towards the center of the dough. Flip the dough over again, seam side down.
- Gently cup your hands around the dough ball. Turn the ball in a clockwise motion about a quarter turn and then softly pull the dough towards you. Do this repeatedly until you see the dough form a tighter and more round shape. Stop if the dough starts to tear.
- With a bench scraper or just your hands, carefully scoop up the dough and lay it upside down (seam side down) into your floured proofing basket and cover it with a plastic bag or a shower cap.
Cold proof
- Place your proofing basket in the fridge to cold-proof for 8-72 hours.Cold fermenting the dough in the fridge slows down the fermentation process, which enhances the flavor of your loaf. It also gives you more flexibility in when you bake your bread.But don’t wait too long! If left in the fridge for too long, your dough will over-ferment, causing the dough to not be able to rise while baking.
Score
- Thirty minutes before baking, place the dough in the freezer. This helps with the scoring design. At the same time, place your Dutch oven in your oven and preheat to 500 degrees F. Allow the Dutch oven to preheat for at least 30 minutes.
- Place a piece of parchment paper on your workspace and gently flip the banneton upside down over the parchment paper. Since you dusted the banneton, your dough should slowly release and fall onto the parchment paper, landing in the middle with the floured side facing up.
- With a lame / razor blade or sharp knife, score a crescent moon shape on top of the dough. This is necessary for your bread to be able to expand while baking.
- Grab the corners of the parchment paper and carefully place the Sourdough Jalapeño & Cheddar dough into your preheated Dutch Oven and cover with the lid.
- Lower the oven to 450 degrees F and bake the bread covered for 30 minutes. Then remove the lid of the Dutch oven and continue to bake the bread for an additional 10-15 minutes with the lid off.
- Once golden brown, and with the internal temperature of at least 205 degrees F, remove the Dutch oven from your oven.
- Using the corners of the parchment paper, lift the sourdough bread out of the Dutch oven and place it onto a wire rack to cool.
- Allow your homemade bread to cool for at least 1 hour before cutting into it. (I know! How can you possibly wait when it looks and smells so good? But trust me, if you cut in too soon, your masterpiece will turn gummy.)
- Once the hour is up, slice into your work of art and slather on some butter, and enjoy!

Hi, I am trying to make this recipe and I am slightly confused under where you have the amount of shredded cheese to add in, you also have 50 g of starter, but you don’t tell us what to do with it .What am I supposed to do with that extra 50 g of starter? I’m excited to try this because I absolutely love every one of your recipes. Thank you for taking your time to create them so we can enjoy them with our families.
Hi Sherri! So sweet! I am happy to hear you have been loving all the recipes so far. You are right! Thank you for pointing out that typo. You will add just the 50g of starter with water, followed by the bread flour and salt. Hope this helps and I hope you love this recipe!
Mine always burns on the bottom if i don’t put rice in the bottom. Is it necessary to preheat Dutch oven? Or can i skip that?
Great question! Yes, this dough can be baked in a cold Dutch oven if that works better for your setup. Preheating helps with oven spring, but it isn’t strictly necessary—especially if you’re dealing with burned bottoms. If you skip preheating, expect a slightly less dramatic rise, but the bread will still be delicious.
To prevent burning, you can also try placing a baking sheet on the rack below your Dutch oven, using parchment paper, or lowering the oven rack one level. Adding rice or a trivet is another great trick, so keep doing that if it’s working for you!
Question, I just made this loaf but was a little confused. In the recipe you have the inclusions being added at the second stretch and fold and in the bakers schedule they are added after the preshape rest when shaping to bake or cold retard. Did I misunderstand the recipe instructions… thank you for sharing this great recipe
Thanks so much for catching that! The inclusions should be added during the stretch and folds so they get evenly distributed throughout the dough. The baker’s schedule should reflect that, so I’ll update it for clarity. Thank you so much for sharing!
If I am using a cast iron loaf pan with another loaf pan on top do I need to adjust baking times or temperature?
Great question! Using a cast iron loaf pan with another pan on top will trap steam nicely (similar to a Dutch oven), which helps with oven spring and crust. Because cast iron holds heat so well, you usually don’t need to adjust the temperature, but the bake time might be slightly shorter or longer depending on how quickly your loaf colors. I’d suggest baking as written, then checking for doneness toward the end — if the crust looks right but the inside still needs more time, you can tent with foil and continue baking. An instant-read thermometer (about 200–205°F inside) is the best way to be sure it’s fully baked.
This is the stuff food dreams are made of. The loaf turned out so beautifully, soft and so flavorful. The only change I made was swapping 15% of the water with pickled jalapeno juice. Thank you for the work you put into your recipes, every one I’ve made has been amazing.
The inclusion of the pickled jalapeno juice – brilliant! I’m going to have to give this a try myself. So glad you are enjoying the recipes, means so much!